RESTStub
Overview
This component is used to expose an Event Process or a part of an Event Process as a RESTful web service deployed in the Peer Server. A RESTful web service is a simple web service implemented using HTTP coupled with the principles of REST. It is a collection of resources. WADL (REST equivalent of SOAP's WSDL, that is, Web Services Description Language) for the service deployed can be fetched when this component is running and the URL of the WADL can be used by clients to access the Web Service. Each instance of the component hosts a single web service.
The component can be configured in three ways:
- Manually defining the resources and methods that are supported by the service in the Configuration Property Sheet (CPS) of the component.
Loading a predefined WADL.
The populated RESTful web service details can be edited if required
- For a simple case of exposing a single resource, the resource URL can be specified and WADL can be generated using the Analyze URI functionality.
The WADL generated for the component will differ from the WADL provided in the following aspects:
- Base path of 'resources' element
- If the provided WADL contains multiple 'resources' elements, only the first resources element will be loaded and used.
The component generates a request and response port for each method present in the configured web service.
How it Works
During the component launch, the following activities happen sequentially:
- It checks if a web service with the same web service name is already deployed.
- If no other service with the same name exists, the web service is deployed to the Jetty Server running in the Peer Server that hosts the component.
- The web service deployed in the Jetty accepts requests from RESTful web service clients and sends the request using an internal JMS client to the request port of the operation thereby injecting the request into the Fiorano Event Process for processing the request.
- On processing the request, the response gets generated and is sent to the corresponding response ports.
- The web service receives the response from the internal JMS client and in turn sends the response as HTTP response to the client that made the request.
The component acts as a helper to expose an event process as a RESTful service. The developer of an event process will have to take care that the functionality is exposed as per the guidelines of REST architecture.
Configuration
The component can be configured using the Configuration Property Sheet (CPS).
WADL Definition
WADL can be defined in the component CPS as below.
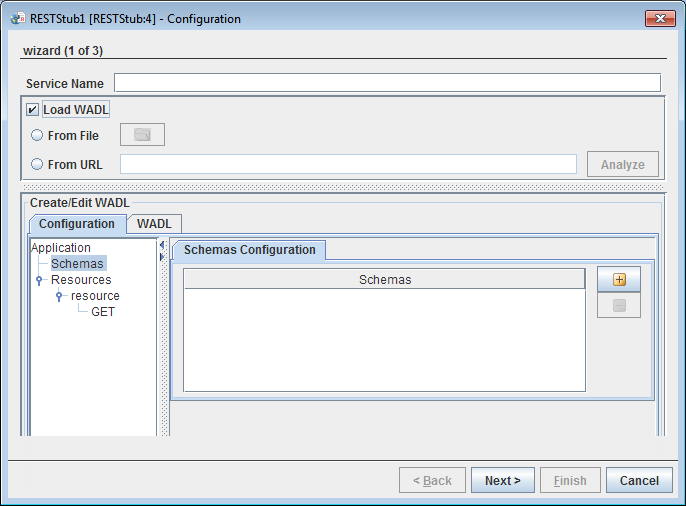
Figure 1: Configuration Property Sheet
This panel is used to define the web service using a user interface for WADL. A user can create a WADL by manually defining different aspects of the service or can load an existing WADL and then edit the configurations.
For detailed information on WADL, please refer http://www.w3.org/Submission/wadl
Service Name
The name of the service with which the event process functionality is to be exposed as a RESTful service can be specified here. The base path for the resources defined by this component is calculated with the help of the service name provided in the following format:
http(s)://<Peer Server IP>:<Peer Server Port>/restgateway/services/<service name>The URL can be viewed by selecting the option "View WADL" from the context menu of the component in eStudio.
Load WADL
WADL file can be loaded to define the configuration as shown in Figure 2. To load an existing WADL file, the checkbox Load WADL must be selected which activates the options below.

Figure 2: Loading WADL
From File
The WADL file can be loaded by selecting the corresponding radio button using the file dialog that opens up by clicking the Folder icon. If the loaded WADL file has more than one 'resources' element defined, then you can select the preferred one from the list for configuration.

Figure 3: Resources selection
From URL
The WADL can also be loaded by analyzing a URL. This option can be used to avoid creating a resource hierarchy from scratch. A Valid URL has to be specified with the protocol. Resource elements are generated based on the path segments and a GET method is generated for the last path segment. Any Query parameters that are part of the resource will be added as parameters to the method's Request with param style as Query and default value as the value specified.
WADL Definition Views
Details of the selected WADL are shown in two different views—Configuration and WADL. However, web service can be configured using Configuration view only.
Configuration View
The RESTful service can be configured by selecting the nodes in the tree on the left side. When a node is selected in the tree, the panel corresponding to its configuration is shown in the right side pane. The details of different panels corresponding to the nodes are explained in the following sections.
Schemas
The XML schemas which are required for the request and response messages have to be specified in this panel. A schema can be added by clicking the Plus button in the table shown in Figure 1.
There are 3 ways to add schema to the schema repository as below:
- Load from File: Select schema by browsing from the respective location; the content in the schema file is shown in the area given.
- Load from Port Schemas: Schema is directly added to the Schema Repository by fetching from the output port of the connected component.
- Load from Schema Repository: Schema can be fetched from the Schema Repository. In this case, the required schemas have to be added to the schema repository using eStudio.
The elements dialog in representation will be populated from the schemas that are specified in this panel.
Resources
The resources node will act as a parent of all the resources that are added as part of this service. It provides the base path for all these resources.
In the case of the RESTStub component, the base path is automatically generated during the deployment of the component.
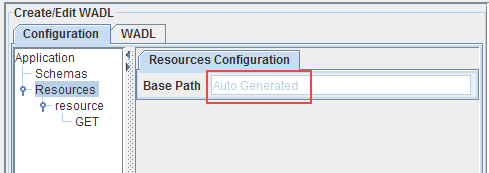
Figure 4: Base Path displayed as "Auto Generated"
The value will be replaced by the following during runtime:
http(s)://<Peer Server IP>:<Peer Server Port>/restgateway/services/<service name>A resource can be added to a resources element by selecting the option Add Resource in the Resources context menu.

Figure 5: Adding a response
Resource Configuration
A resource logically represents an entity whose operations have to be exposed using the RESTful service. It may optionally be used to specify just a path segment for a child URL with no methods defined on the resource itself.
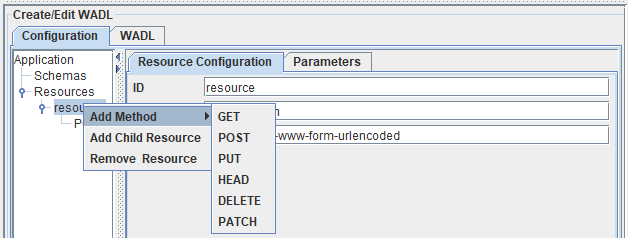
Figure 6: Adding child resources and methods
- Add Method: Operations such as GET, POST, PUT, HEAD, DELETE and PATCH can be added by selecting the option Add Method as shown in the figure above.
- Add child Resource: A resource can be added to a resource element by clicking the option Add Child Resource.
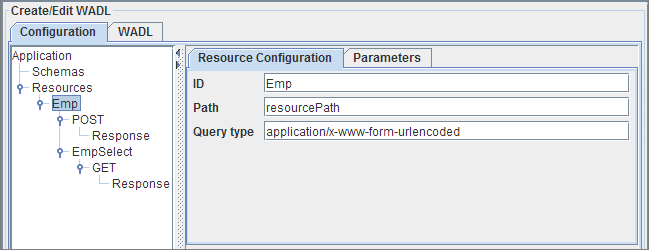
Figure 7: Resource configuration
ID
The identifier for the resource can be specified using this element. This identifier is used in the generation of port names and schemas corresponding to the methods that are defined on this resource or any of its child resources.
The ID has to be unique among its siblings. The complete ID of a resource will be computed using information on parent IDs as below.
Example
If the resource with ID "parent" is added to the Resources element (using the Add Resource option) and a child is added to the resource (using the "Add Child Resource" option) with ID "child", the complete ID of the resource will be parent__child.
Path
The path of the resource, relative to its parent resource/resources element has to be specified against this field.
The path of a resource has to be unique among the siblings of a resource. The path of a resource will be computed including information of parent paths as below. The path can contain any symbols, numbers, and characters.
Example
If the resource with path "parent" is added to the Resources element (using the Add Resource option) and a child is added to the resource (using the "Add Child Resource" option) with path "child", the actual path of the resource will be <Resources Base Path>/parent/child.
Templates are allowed in the path element. A template will have the form {<template name>}. When a template element is used a parameter with the same name and style as the Template has to be defined. The request message on the port corresponding to this resource will have the value from the URL as explained below.
Example
If a resource has ID "resource" and path as {studentID}, then a request to URL <Parent Path>/178 will result in a request message having a parameter as follows:
.. <resource>
<studentID>178</studentID>
</resource>..
Please refer to the generation of port schemas for more information.
QueryType
The property defines the media type for the query component of the resource URI. The value defaults to 'application/x-ww-form-urlencoded' if not specified which results in query strings being formatted as specified in section 17.13 of HTML 4.01.
Method Configuration
Methods that resource supports can be added by using the context menu of a resource as shown in Figure 5.
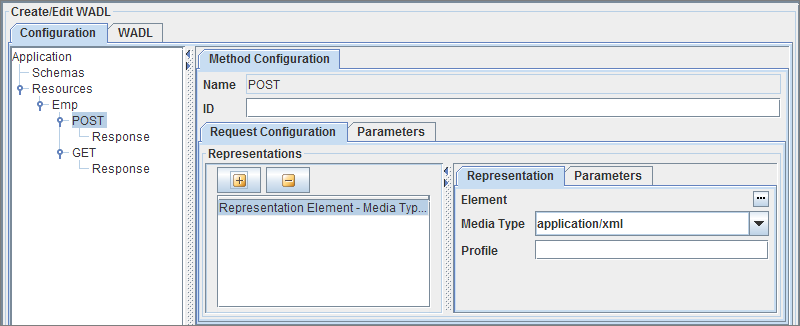
Figure 8: Method Configuration
The Request Configuration of a method can also be configured in this panel.
Name
The attribute holds the name of the method that the resource supports. The attribute is not editable. The name will be used in the generation of ports and schemas for the component.
Two methods on a resource can have the same method name. In such a case, ID has to be specified for the method to differentiate between the methods.
ID
The method ID acts as a differentiator between methods of the same resource with the same name. This is required only if the resource defines more than one method with the same name.
Request configuration
The request for a message can be configured in the panel corresponding to the method as shown in Figure 7. As part of the request, one can define multiple representations. Different representations can have different media types and elements defined. The media type requested will be sent as part of the request message. It's the responsibility of the event process developer to return the appropriate content type based on the request.
Configuring representations is explained in detail in the Response Configuration section below.
Similarly, the request parameters can be configured for a particular method by using the parameters tab. Configuring parameters is explained in detail in Representation Configuration the section below (after Response Configuration section).
Response configuration
A method can have multiple responses. Different responses cater to different sets of status codes. A response element can be added by using the context menu on a method as shown in the below figure.
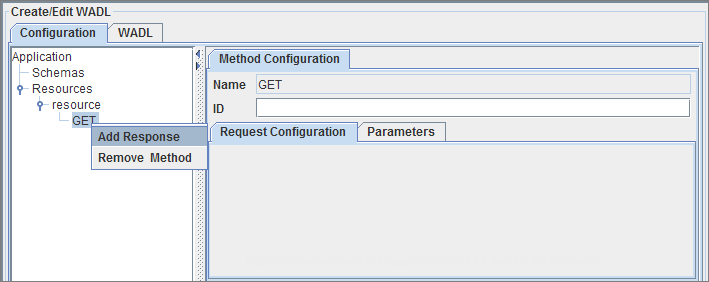
Figure 9: Adding Response
The response can be configured using the panel as shown in the below figure.
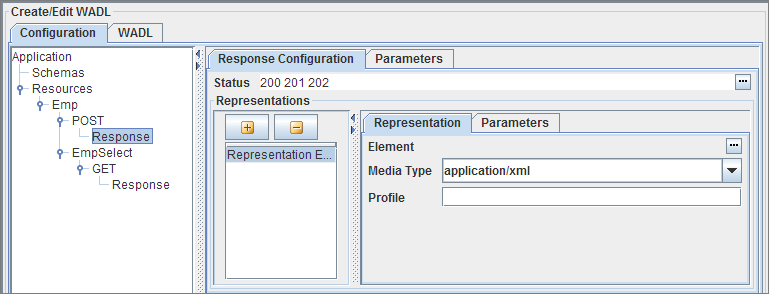
Figure 10: Response configuration
Status
The status of the response can be space separate list of the standard HTTP status codes or any custom codes defined in the application. The status codes can be selected among standard HTTP status codes by clicking on ellipsis against this property as shown in the figure below. 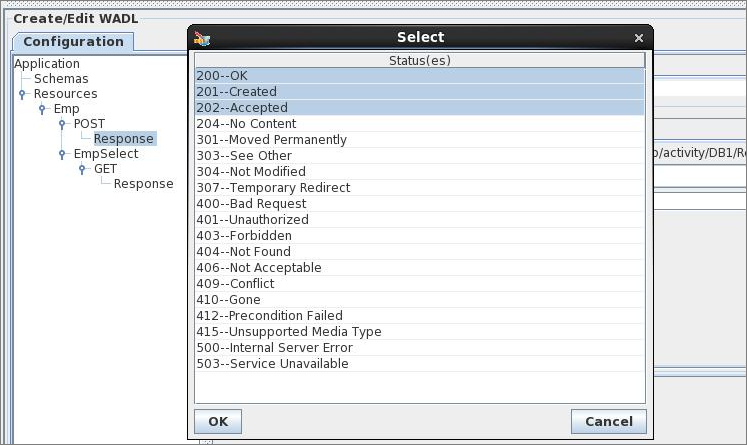
Figure 11: Configuring status
Representations
Similar to a request, each response (corresponding to a set of statuses) can have multiple representations. The representations provide different views of the same response as defined by the media type.
Representation configuration
Multiple representations can be defined for both request and response of a method as shown in the below figure.

Figure 12: Representation Configuration
Element
The element can be used to specify the XML schema of an element corresponding to the representation. The schema corresponding to the element has to be added to the schema repository using eStudio and an include has to be added using the Schemas panel as explained in the "Schemas" section.
The element can then be selected by clicking on the ellipsis and selecting the element as shown in the below figure.
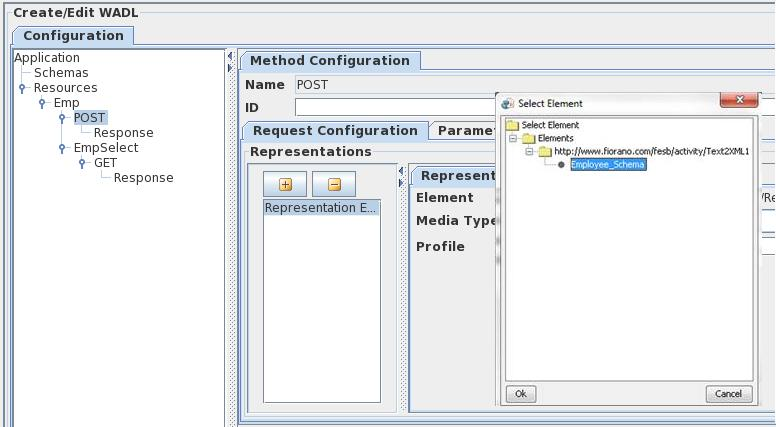
Figure 13: Configuring elements
MediaType
The media type of a representation defines the type of content that is present in the representation. The media type can be configured by selecting the appropriate one from the drop-down or manually specifying in the combo as shown in the figure below.
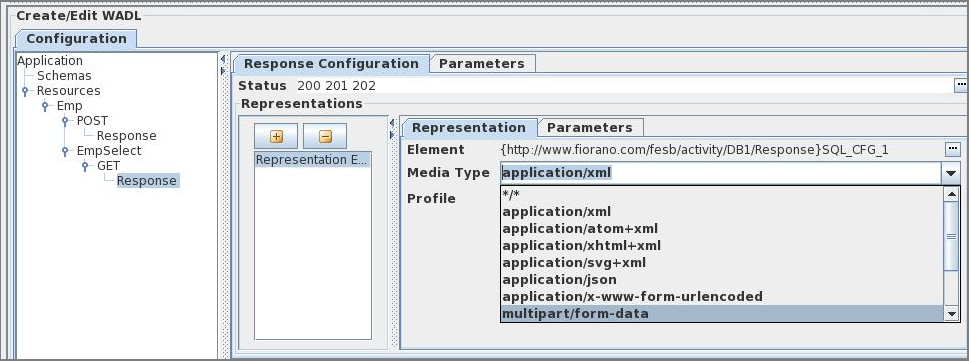
Figure 14: Media Type configuration
Profile
The attribute is similar to the HTML profile attribute, and gives the location of one or more metadata profiles, separated by white space. The meta-data profiles define the meaning of the rel and rev attributes of descendant link elements
Parameter configuration
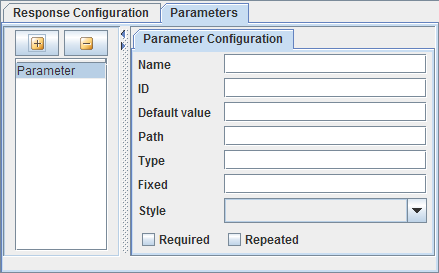
Figure 15: Parameter Configuration
Parameters are present at different levels in a resource tree. These can be configured using the UI as shown in the figure above.
The different attributes of a parameter are as follows:
| Attribute | Description |
|---|---|
| Name | The name of the parameter is an xsd:NMTOKEN. Required. |
| Default value | Optionally provides a value that is considered identical to an unspecified parameter value. |
| Path | When the parent element is a representation element, this attribute optionally provides a path to the value of the parameter within the representation. For XML representations, the use of XPath 1.0 is recommended. |
| Type | Optionally indicates the type of the parameter as an XML qualified name, defaults to xsd:string. |
| Fixed | Optionally provides a fixed value for the parameter. |
| Style | Indicates the parameter style, only the allowed values are populated in the combo box of a certain configuration. |
| Required | Optionally indicates whether the parameter is required to be present or not, defaults to false (parameter not required). |
| Repeated | Optionally indicates whether the parameter is single-valued or may have multiple values, defaults to false (parameter is single-valued). |
| Options | An option element defines one of a set of possible values for the parameter represented by its parent parameter. An option has the following attributes:
|
Error Notifications

Figure 16: Error Notifications
The validation for a particular panel is done when the user tries to navigate away from the tree node corresponding to the panel. Validation errors corresponding to the particular panel are shown using the error notifying dialog.
WADL
This is a read-only view of the WADL that is generated from the configuration done using the configuration view.
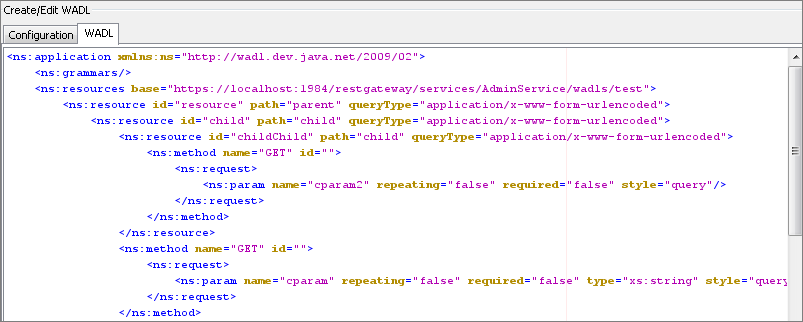
Figure 17: WADL view
Transport Security
SSL Configuration
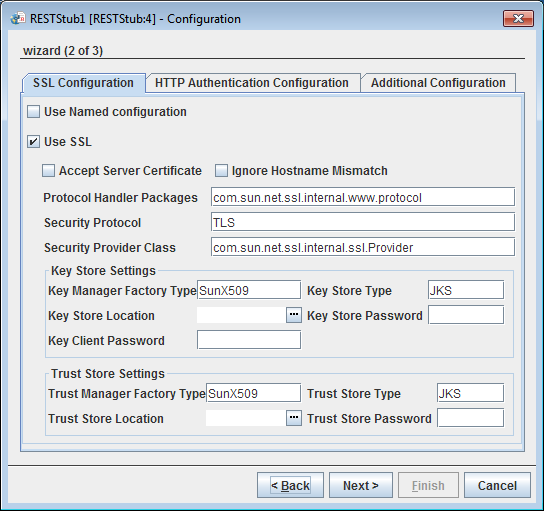
Figure 18: SSL Configuration
Please refer SSL Configuration section in JMSIn5.0 page.
HTTP Authentication
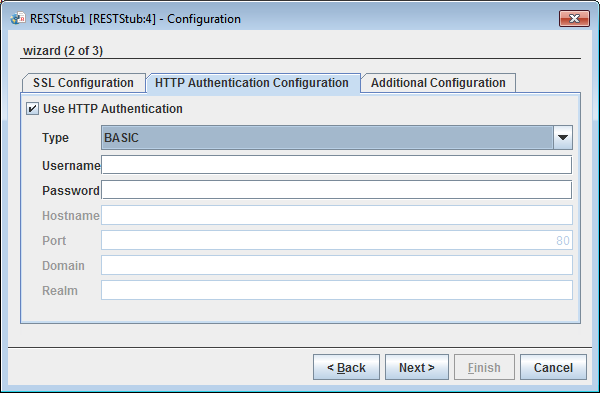
Figure 19: HTTP Authentication
Use HTTP Authentication
HTTP authentication support for the Web Services can be provided by selecting this property.
Type
The type of HTTP Authentication can be selected for the drop-down. At present only BASIC authentication is supported.
Username
Username to be used by the RESTStub component while deploying the Web Service. The entry for this username has to be present in the Realm.properties file. If this username is not present, the component will not launch.
Password
Password to be used by the RESTStub component while deploying the Web Service. If this password is not present in the Realm.properties file the component will not launch.
JWT Authorization Configuration
Enable the Use JWT Authorization option and provide the credentials, Key ID, etc.
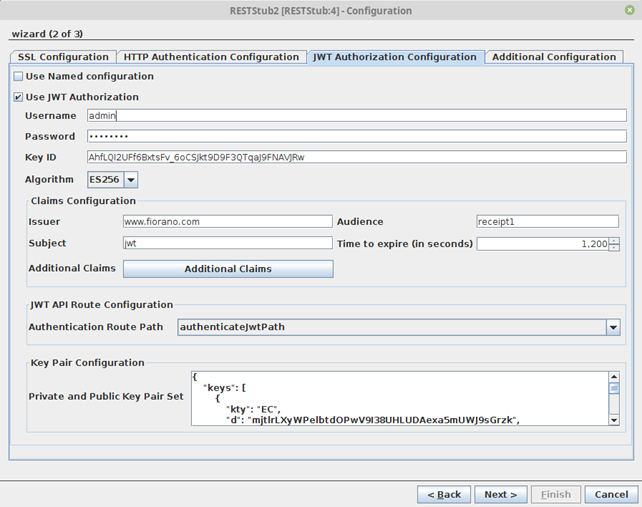
Figure 20: JWT Authorization Configuration properties
Use JWT Autherization
Enable JWT Authorization for all routes
- Username: Username to be used by the RESTStub component for verifying username in JWT token issue requests
- Password: Password to be used by the RESTStub component for verifying password in JWT token issue requests
- Key ID: The KID field as present in the public and private key pair set
Claims Confguration
The claims will be present as key-value pairs inside the JWT token
- Issuer: Refers to the serving authority issuing the JWT token
- Audience: Refers to the audience intended for the JWT token
- Subject: Simple subject to be embedded in the JWT token
- Time to expire (in seconds): The time in seconds which would be taken for token expiry. Token issue time = time to expire = Token expiry time
- Additional Claims: Additional claims that can be customized for specific use cases as key-value pairs.
JWT API Route Configuration
The route configured in the Resource Configuration panel which would be responsible for token authentication and token issue.
Key Pair Configuration
Private and Public Key Pair Set. Public and Private Key pairs in JWK format
Refer to the Configuring JWT Authentication in RESTStub section for the entire configuration steps for the JWT Authorization to work.
Additional Configuration
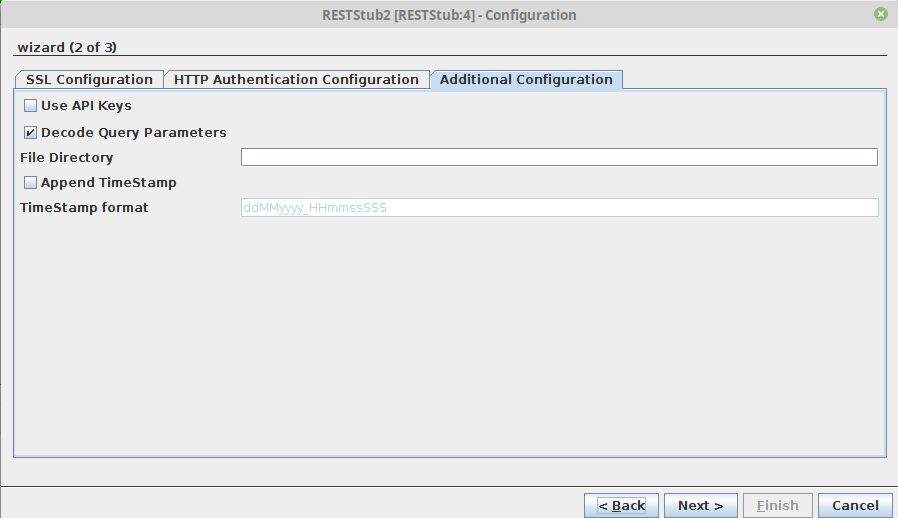
Figure 21: Additional Configuration
Use API Keys
Enable this property to support API key authorization
Decode Query Parameters
Validates the parameter URL. This property is enabled by default.
File Directory
This option is applicable only when the method is set to "POST", the media type is set to "multipart/form-data" and the request content is of File type. When the request content is of file type, the file specified in the request will be uploaded to the directory mentioned in the File Directory field.
Append TimeStamp
Enable this option to append a timestamp to the filename that is uploaded to the file directory.
TimeStamp format
Specify the timestamp format that is to be appended with the filename.
Enabling Basic Authentication
Before enabling this property in RESTStub, basic authentication has to be enabled in the FPS Jetty Server and the bcwsgateway web application (FIORANO_HOME/esb/server/jetty/fps/webapps/restgateway). The procedure to enable basic authentication in Jetty Server and the web app is explained below.
Jetty Server
To enable Basic Authentication in Jetty Server, perform the following actions:
- Stop the FPS Server if it is running.
- Open the FPS profile in Fiorano Studio and navigate to FPS > Fiorano > Esb > Jetty.
- Select the Jetty mbean.
In the Properties of Jetty window, enable the BasicAuthSupported property and give the fully qualified path of the Realm.properties file as the RealmProperties property.
More information on Realms and Realm.properties file content is discussed in the next section.
- Save the profile.
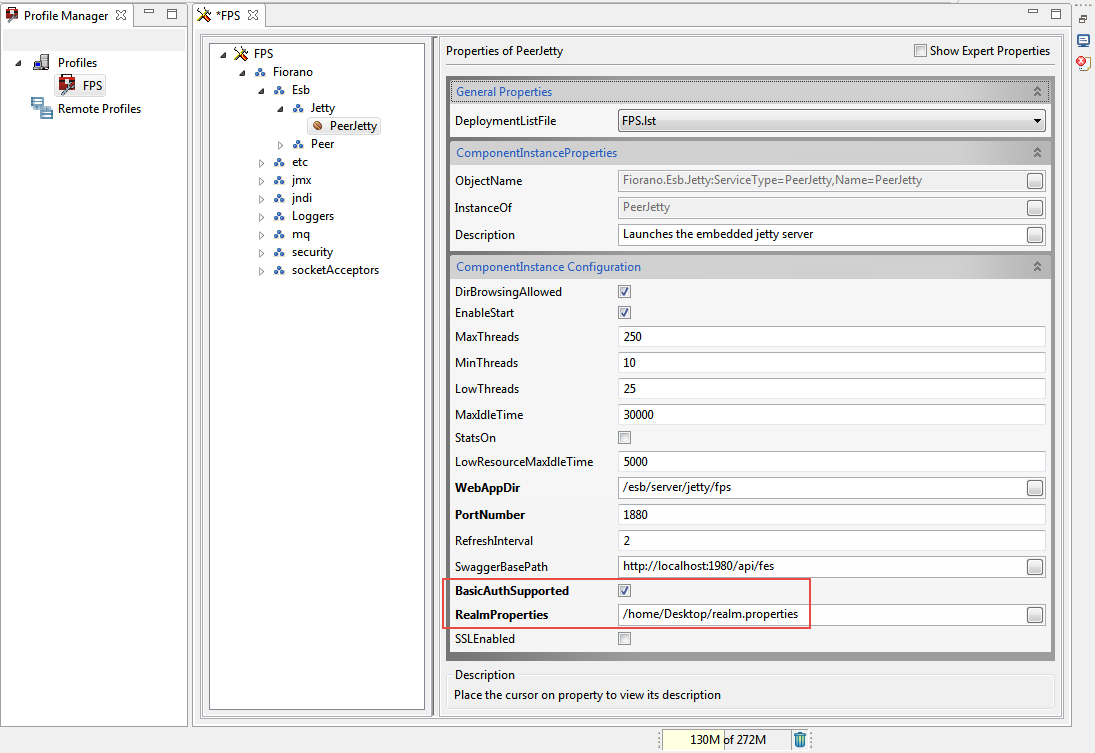
Figure 22: Enabling Basic Authentication in FPS Jetty server
Webapp
To enable Basic Authentication in webapp, perform the following actions:
- Open the Web.xml file located at FIORANO_HOME/esb/server/jetty/fps/webapps/restgateway/WEB-INF.
- Uncomment the security-constraint and login-config elements and save the file.
- Delete the Peer Server cached profile from FES runtime by deleting the folder FIORANO_HOME/runtimedata/EnterpriseServers/<Profile Name>/FES/peers/<peer profile>.
- Start the FPS server.
The basic authentication is enabled in FPS Jetty Server and webapp. Now the authentication can be enabled in RESTStub by setting the value of the Enable authentication property to yes. Provide a set of username and password which is present in the Realm.properties file.
- To confirm the authentication, when the RESTStub component is launched right-click the component and select View WADL option. The web browser prompts the user to enter the username and password to display the WADL.
- When the authentication is enabled in RESTStub, a client can access the Web Service only if it uses the basic authentication with the correct credentials.
UserName
Username to be used by the RESTStub component while deploying the Web Service. The entry for this username has to be present in the Realm.properties file. If this username is not present, the component will not launch.
Password
Password to be used by the RESTStub component while deploying the Web Service. If this password is not present in the Realm.properties file the component will not launch.
Realms
Security realms allow securing web applications against unauthorized access. Protection is based on authentication (identifying who is requesting access to the webapp) and access control (restricting what can be accessed and how it is accessed within the webapp).
A webapp statically declares its security requirements in the web.xml file. Authentication is controlled by the <login-config> element. Access controls are specified by <security-constraint> and <security-role-ref> elements. When a request is received, the web container checks if the user performing the request is authenticated and if the user has a role assignment that permits access to the requested resource. Access to the resource is allowed only when the user is authorized and has the required permissions.
A realm has a unique name and is composed of a set of users. Each user has authentication information (Example: a password) and a set of roles associated.
More than one realm can be configured depending on the needs.
Fiorano uses a simple realm whose authentication and authorization information is stored in a properties file. Each line in the file contains a username, a password, and 0 (zero) or more role assignments.
The format is:username: password[,rolename ...]
where:
- username is the user's unique identity
- password is the user's password
- rolename is the user's role
The sample content of the Realm.properties file is shown below:
- admin: admin,admin
- user: password,user
- guest: guest,read-only
Miscellaneous Configuration
FES Connection Configuration
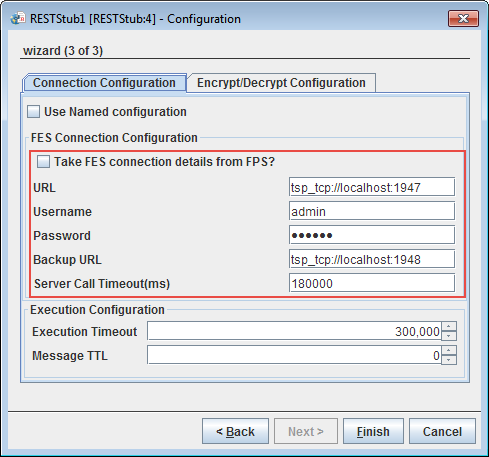
Figure 23: FES Connection Configuration properties
Please refer the FES Connection Configuration section in the HTTPStub page.
Execution Configuration

Figure 24: Execution Configuration
Execution Timeout
RESTStub component receives a client request on its output port and sends the request message to the connected components. After the processing is completed by the connected components, a response message is sent to the RESTStub input port and from there it will be sent to the client.
RESTStub component accepts the response if it reaches before the timeout period. If no response is received, on timeout Error message will be sent to the client saying No message received till the timeout period.
- The request will be processed by the connected components in the Event Process even after the timeout but the response is not sent back to the client by RESTStub.
- Execution Timeout of '0' indicates an infinite timeout.
Message TTL
The request received by the component is parsed and converted into a JMS message. This property indicates the time in milliseconds for which the JMS messages will be stored on the peer server. The default value '0' indicates that the messages will be stored on the server without any timeout.
Encrypt/Decrypt Configuration
Enable the checkbox under the Encrypt/Decrypt Configuration tab to encrypt the messages received/sent at/to the selected port.
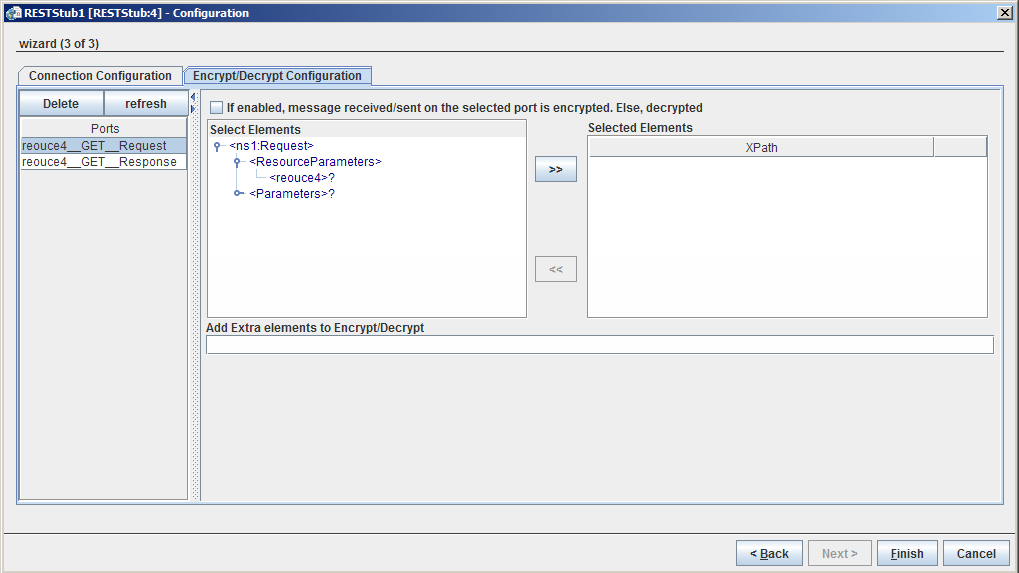
Figure 25: Execution Configuration
Please refer Encrypt Decrypt Configuration section in Common Configurations page.
Port Generation
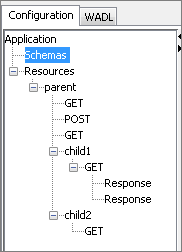
Figure 26: Sample Configuration
A request port and response port are generated for each method configured in the component with suffixes __Request and __Response respectively. The prefix of the port name will be the complete ID of the resource computed (as described in the "Resource" section) followed by the method name.
If a resource has multiple methods with the same name (two GET methods) then the method ID has to be specified for at least one of those methods. The method ID will be appended to the port name prefix to differentiate between these methods. For the sample configuration defined in the figure above, the ports will be generated as shown in the figure below.

Figure 27: Port Generation
Schema Generation
The schemas are automatically generated for the ports based on the configuration.
Request Schema
The schema of the output port corresponding to a method depends on its configuration and its parent resources.
The resource parameters are added as a child element of the element ResourceParameters. The hierarchy of the resources is maintained as it is in the resource chain corresponding to the method. The parameters of a resource are added as its child elements.
The method request parameters are added as child elements to the element RequestParameters. The various representations of the request are added as child elements of the element Representations. The element specified is present as a child element of Element and the representation's parameters are added as child elements of the element representationParameters.
If there are any query parameters other than those specified in the configuration for the method, these parameters are added as part of the Parameters element.
For the sample configuration shown in Figure 23, the schema generated for the port parent __POST_Request is as in Figure 25.
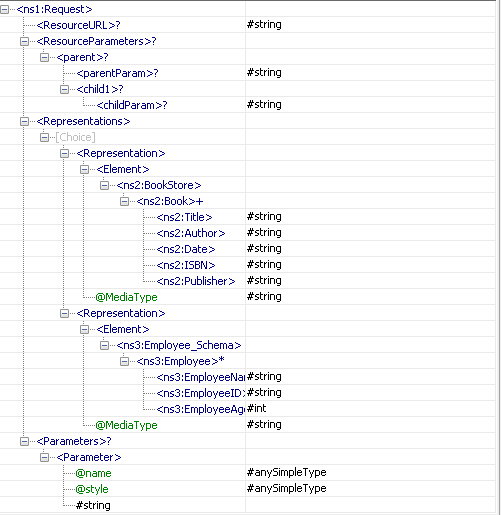
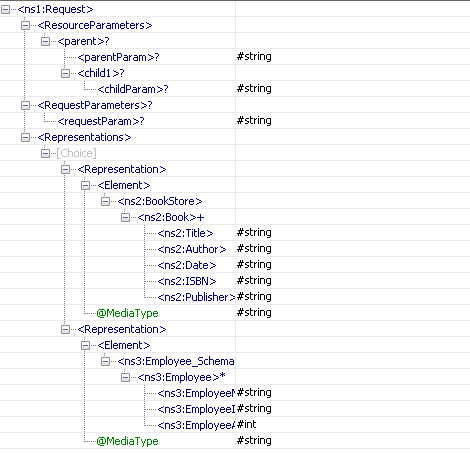
Figure 28: Schema of port parent __POST_Request
Response Schema
The schema of the input port corresponding to a method depends on its configuration. The schema is populated on the response port of a method only if it has a response as its child element.
For each response configured a Response element is added as a child element of the root element. The status of the response is present as an attribute of this element. The response parameters corresponding to a particular Response are added as child elements to the element ResponseParameters.
The various representations of the response are added as child elements of the element Representations. The element specified is present as a child element of Element and the representation's parameters are added as child elements of the element representationParameters.
For the sample configuration shown in Figure 23, the schema generated for the port parent_child1_GET_Response is as in Figure 26.
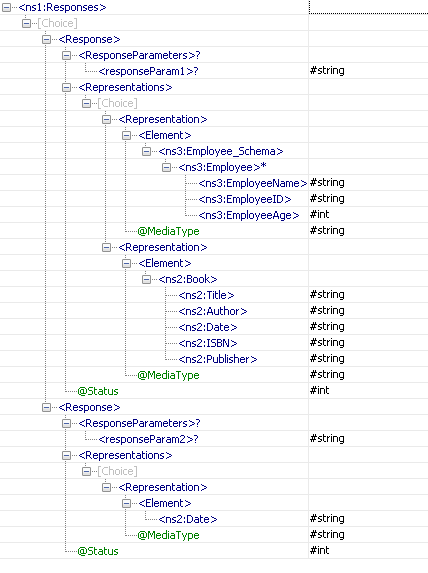
Figure 29: Schema of port parent_child1_GET_Response
Functional Demonstration
Refer to the REST Services section for a detailed demonstration of the functionalities of each of the below:
These scenarios involve the RESTConsumer microservice as well, which works in conjunction with RESTStub. Refer to the RESTConsumer documentation to configure and run the event processes.
Configuring JWT Authentication in RESTStub
- Open RESTstub CPS and provide the component service name in the Service Name property.
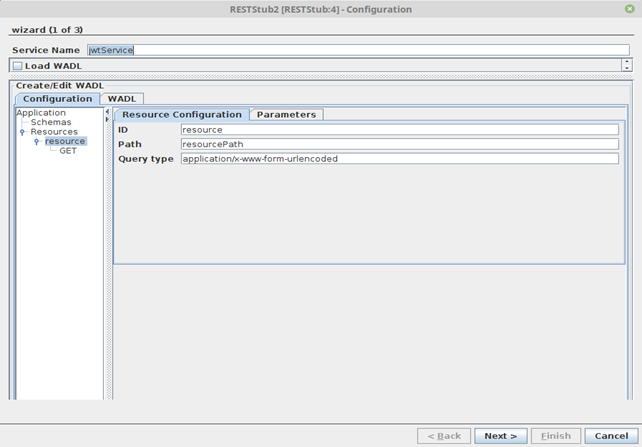
For JWT Authentication in RestStub, there needs to be one mandatory route for authenticating credentials and issuing JWT token.
Add a new resource with resource ID “authenticateJwt” and resource Path “authenticateJwtPath” which will be the token authentication and the token issue route to imply that both the token authentication and issue are handled by the same route "authenticateJwtPath".
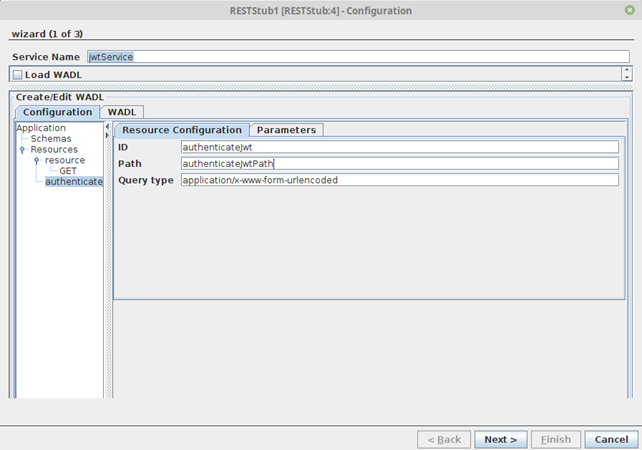
When the JWT option is enabled in the subsequent wizard panel, the other resources apart from the JWT Authentication resource will by default expect a JWT token in the header in the RFC6750 format “Bearer”.
Add POST request to the authenticateJwt resource and navigate to Method Configuration > Request Configuration. Add a new representation and select the Media Type ‘application/json’.
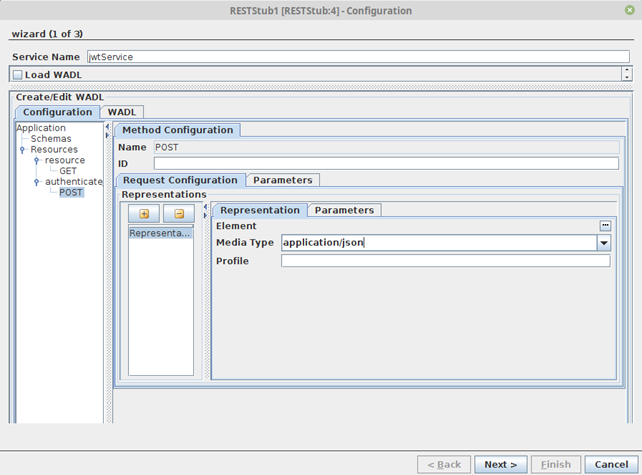
Currently, RestStub only supports JSON input as the credentials payload for JWT authentication.
- Navigate to the JWT Authorization Configuration tab and enable the Use JWT Authorization option.
Key ID is to be entered as it is entered in the “Private and public key pair set” KID field.
This is mandatory to ensure ‘KIDs’ match.
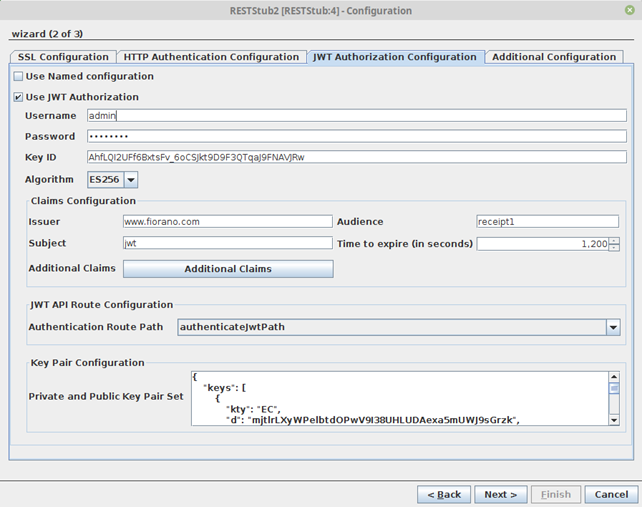
Public and private keys are expected as key pair set in JWK format.
Sample JWK Key pair set for testing is available at: https://mkjwk.org/
- Additional Claims can be added to have custom key-value pairs in the JWT token apart from those in the Claims Configuration.
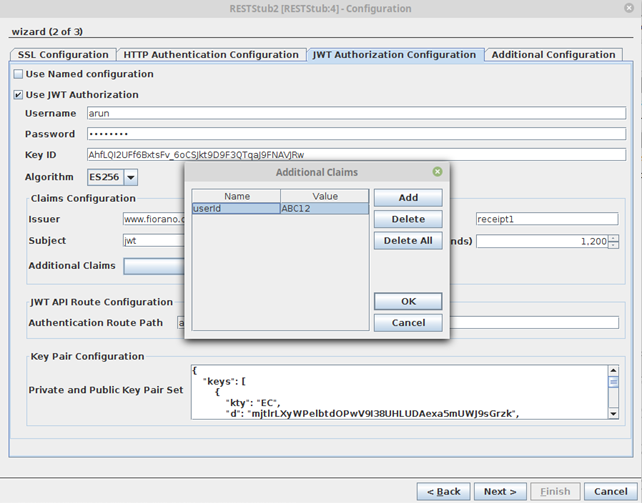
- Complete the CPS wizard upon configuration.
- Perform Route Transformations and run the event process after the JWT configuration is complete.
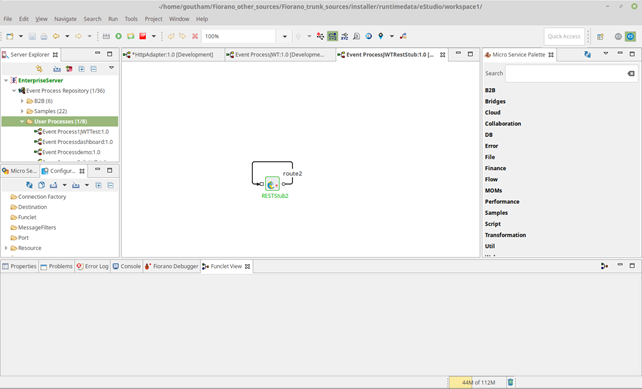
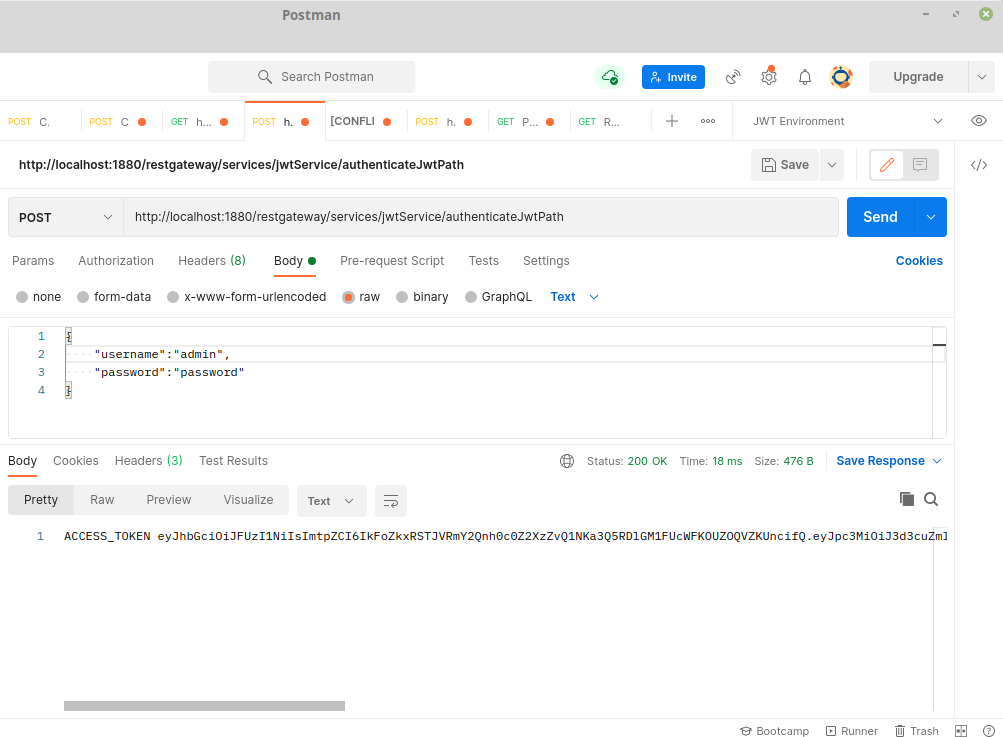
- Send a REST request by copying the JWT resource WADL URL of the RestStub and also enter the authentication credentials in the Body payload (in the Postman app used for this example).
- Upon successful request, the response returns an “ACCESS_TOKEN” in the response body.
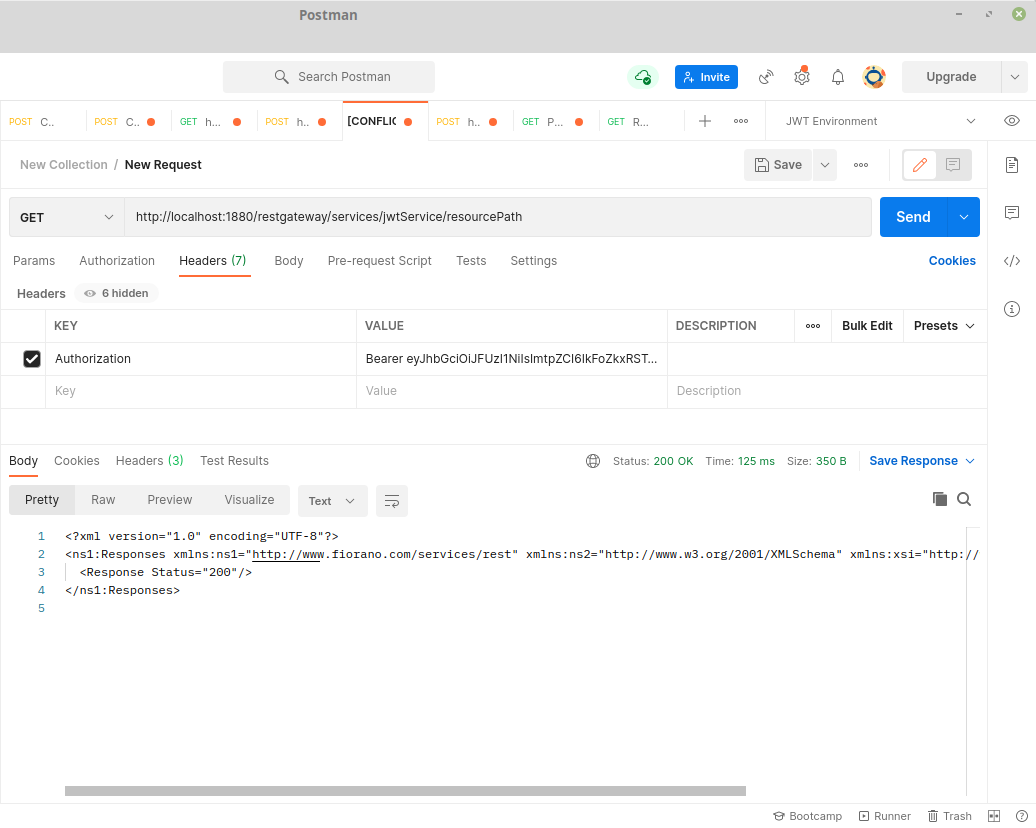
- Now the other routes will by default require an Authorization Header in RFC6750 format with Bearer token accessed in the step above. If the request is sent successfully, the response is returned.
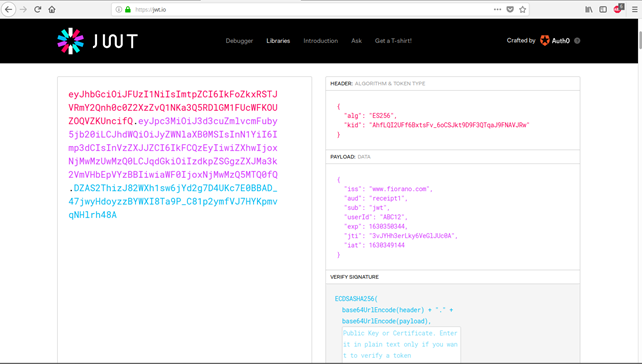
- The JWT token can be analyzed by decoding to observe the claims and additional claims as configured in the CPS.
Useful Tips
- For SSL to work properly the JDK version used should be greater than 1.5.0_08 and the jars present in JDK_HOME/jre/lib/ext should be copied to $FIORANO_HOME/esb/lib/ext.
- When the RESTStub component is configured to launch on HA (High Availability) Peer Servers
- If both Primary and Secondary Servers are on the same machine:
Initially, if RESTStub is launched on the Primary Server, the generated WADL URL contains the Primary Server's jetty port number. In case of Primary Server failover, the Secondary Server becomes Active and relaunches the component. WADL will be regenerated and if the Secondary Server uses a different jetty port then the WADL URL is changed. The clients have to be reconfigured to use a new URL in this case.
To avoid this situation, it is recommended to use the same jetty ports for both Primary and Secondary Peer Servers.
Jetty service will be started only after the server is started successfully. In the case of HA, only one server will be active at a given time and the Jetty Server will be running only in the active server and there will be no bind exceptions even if both the servers use the same port number for Jetty.
- If both Primary and Secondary Servers are on the same machine:
- If both Primary and Secondary servers are on different machines:
In this case, if the failover happens the hostname/IP address in the WADL URL will be changed. So the clients have to be reconfigured accordingly.
- If both Primary and Secondary servers are on different machines:
- The service name must be unique for RESTStub instances configured on the same peer server.
- Headers received by the component are sent out as JMS properties with http_ prefixed to their name.
- The component acts as a helper to expose an event process as a RESTful service. The developer of an event process will have to take care that the functionality is exposed as per the guidelines of REST architecture.
- When the content type of request is application/octet-stream the content is sent as bytes content in the message, this will be present as bytes property. This can be retrieved as Base 64 encoded string in mapper using the funclet Byte-Content in JMS Message funclets.
Examples
- REST HelloWorld - a simple example using the RESTStub service.
- REST Attachments - an example using advanced functionalities.
