
AS2connector component serves as a connector to send/receive messages as per AS2 protocol.
AS2 (Applicability Statement 2) is a specification about how to transport data securely and reliably over the Internet. Security is achieved by using digital certificates and encryption.
AS2Connector can be configured in two modes as below:
-
Send: To send encrypted/signed message to receiver.
-
Receive: To decrypt and verify the signature of message received.
Configuration and Testing
The component can be configured using the Configuration Property Sheet as explained in the following sections.
Connection Configuration
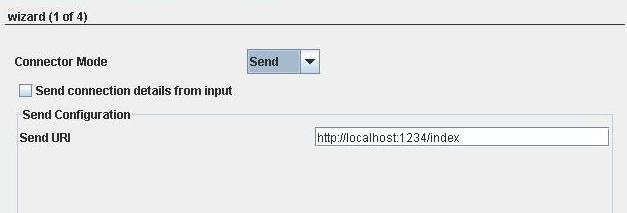
Figure 1: Connection configuration details
Attributes
Send connection details from input
If this property is enabled, parameters to create the connection can be specified in the input message.
Connector Mode
Send
When Send mode is chosen, Send Configuration section appears as in Figure 1.
Send URI
URI where the HTTP server is present.
Receive
When Receive mode is chosen, Receive Configuration section appears as below.
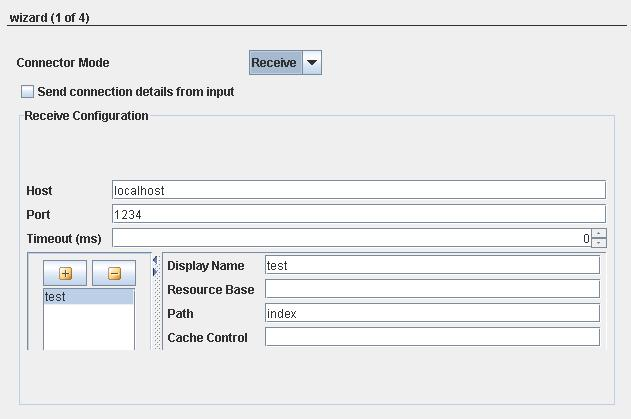
Figure 2: Receive Configuration details
The descriptions for the Send Configuration parameters are provided in the below table:
|
Attributes |
Description |
|---|---|
|
Host |
The host name or the IP address where the server will be started. |
|
Port |
The port number on which server will run. |
|
Timeout (ms) |
To specify the time till which this component will wait for acknowledgment. Default value is 0 which specifies infinite timeout. |
New server instance can be created by clicking the Plus button in the Receiver Configuration section.
|
Attributes |
Description |
|---|---|
|
Display Name |
The unique display name for the context. The names of the ports that are generated corresponding to a context are suffixed by __<Display Name>. |
|
Resource Base |
Location of the resource that contains static content like images, css and so on. This can be any valid path in the file system (may also be relative to %FIORANO_HOME%\runtimedata\PeerServers\<profile-name>\FPS\run\components\AS2Connector\4.0) or a web URL. The resources present in resource base will then be hosted in URLs of the form http://<hostname>:<port>/<contextpath>/<resource> |
|
Path |
The unique context path of the AS2 request corresponding to a context. The path of the context will be computed relative to the server details provided by properties Host Name and Port. The URI of a context will be http://<Host Name>:<Port>/<Path>. |
|
Cache Control |
The cache control mechanism that is to be used to cache the static content. For example, cache control value "max-age=3600,public" states that static content would be cached for up to an hour and shared between all users, without checking the server. For valid Cache-Control values, please refer to http://www.w3.org/Protocols/rfc2616/rfc2616-sec14.html#sec14.9 |
AS2 Configuration
The next panel has four sections as follows:
-
Encryp/Decrypt Configuration
-
Signature Configuration
-
MDN configuration
-
AS2 Headers
The attributes available in each section and their description are mentioned in the below sections.
Encryp/Decrypt Configuration
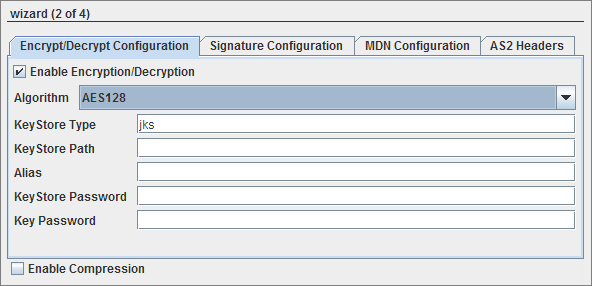
Figure 4: Encryption configuration details
Enable Encryption/Decryption
When this option is selected, message will be encrypted in case of Send connect mode and decrypted in case of Receive connect mode with the provided algorithm and Keystore details.
Algorithm
Algorithm to be used while encrypting/decrypting. The types of algorithm that are available in the drop-box are:
-
AES128
-
AES192
-
AES256
AES is a block cipher, 128, 192 and 256 being the variable key length in bits. -
DESEDE3
DES, the Data Encryption Standard, is triple-DES encryption where an encrypt operation is encrypt-decrypt-encrypt, and decrypt is decrypt-encrypt-decrypt. -
RC2
RC2 is a block cipher with a 64-bits block cipher with a variable key size that range from 8 to128 bits.
|
KeyStore Settings |
Description |
|---|---|
|
KeyStore Type |
For Java keystore file format, this property has the value jks(or JKS). You do not normally specify this property, because its default value is already jks. |
|
KeyStore Path |
Password to access the private key from the keystore file. |
|
Alias |
If the operation is SEND, Host private key alias should be configured.If the operation is RECEIVE, Partner public key certificate alias should be configured. |
|
KeyStore Password |
Password to unlock the keystore file (store password). |
|
Key Password |
Specifies the password for the key pair. |
Refer to Keystore Configuration Section below for configuring keystore and certificate alias details.
Signature Configuration
Enable Signing
Enable this to sign or verify signature of a message.
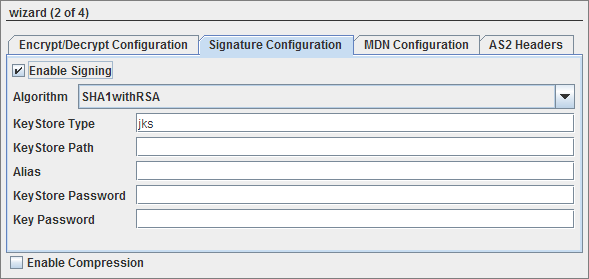
Figure 5: Signature configuration details
Algorithm
Algorithm to be used while signing. The types of algorithm that are available in the drop-box are:
-
SHA1withRSA
-
MD5withRSA
Refer Enable Encryption/Decryption section for the description about KeyStore.
MDN Configuration
MDN provides a notification of disposition of a message, that is, whether it was decrypted and read by recipient, discarded before being read etc.
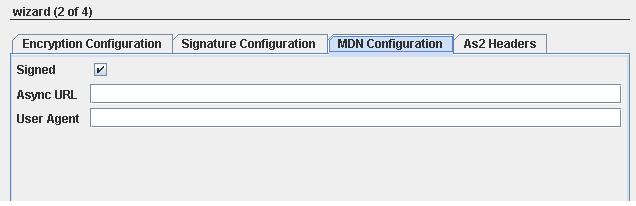
Figure 6: MDN configuration details
Working of a MDN is as mentioned below:
-
Upon the receipt of the message and its successful decryption or signature validation (as necessary) a "success" MDN will be sent back to the original sender. This MDN is typically signed but never encrypted (unless temporarily encrypted in transit via HTTPS).
-
Upon the receipt and successful verification of the signature on the MDN, the original sender will "know" that the recipient got their message (this provides the "Non-repudiation" element of AS2)
-
If there are any problems receiving or interpreting the original AS2 message, a "failed" MDN may be sent back. However, part of the AS2 protocol states that the client must treat a lack of an MDN as a failure as well, so some AS2 receivers will simply not return an MDN in this case.
-
MDN messages can be returned asynchronously and synchronously. As per default settings, MDNs are sent synchronously.
-
Synchronous MDN allows AS2 MDNs to be returned to AS2 message sender clients over the same HTTP connection they used to send the original message. This "MDN while you wait" capability makes "AS2 Sync" transfers the fastest of any type of AS file transfer, but it also keeps this flavor of MDN requests from being used with large files(which may time-out in low-bandwidth situations)
-
Asynchronous MDN allows AS2 MDNs to be returned to the AS2 message sender's server later over a different HTTP connection. This flavor of MDN request is usually used if large files are involved or if your trading partner's AS2 server has poor Internet service
In Asynchronous MDN, sender specifies to which URL it wants to get MDN from receiver,so this property is enabled only in SEND mode.
Signed
Select this for signing MDN, which will set the disposition-notification-options AS2 Header for default value. signed-receipt-protocol=required,pkcs7-signature; signed-receipt-micalg=required,sha1,md5.
Async URL
URL where the MDN should be sent to for Asynchronous MDN. The provided URL will be set as Receipt-Delivery-Option AS2 header.
User Agent
User which processes the AS2 request.
Enable Compression
Enables compression of signature.
AS2 Headers
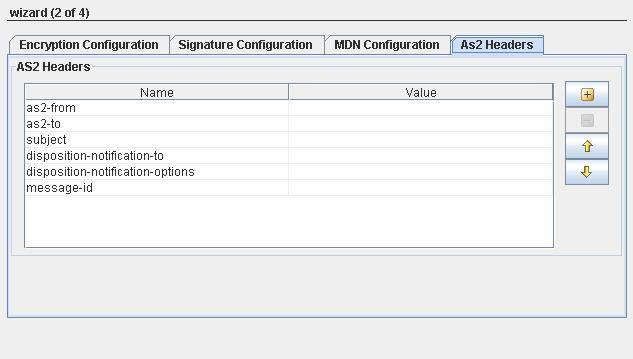
Figure 7: AS2 Headers details
Some of the AS2 headers are added by default. User can add/remove headers as necessary.
-
as2-from: Sender of AS2 message.
-
as2-to: Receiver to whom the AS2 message is sent to.
-
subject: Specifies the subject of the message.
-
Disposition-notification-to: If this header present, it serves as a request for MDN to be returned.If it is accompanied by receipt-delivery-option header, then it is a request for an asynchronous MDN.If not, it is a request for Synchronous MDN. If this header property is absent,then MDN is not required.
-
disposition-notification-options: MDN options that deals with signing like signed-receipt-protocol and signed-receipt-micalg.When signed-receipt-protocol is set to "pcks7-signature",is used to request a signed receipt from receiving party and indicates the format in which the signed receipt should be returned to requestor.Similarly micalg specifies sender's desired algorithms with which receiver should sign MDN by.
-
message-id: Identifier of message.
Keystore Configuration
Generating a Client Keystore
A keystore is a file that holds the public and private key pairs and certificates. The Keystore is a database of public and private keys. Java keytool is used to generate the public/private key pairs. Java keytool utility is present at %JAVA_HOME%/bin.
To generate a keystore, open the command prompt and type in the following command line and press the Enter key:
%JAVA_HOME%\bin\keytool -genkey -alias [alias name] -keystore [keystoreName] -keyalg [algorithm] -validity [days in integer] -storepass [store password] - keypass [key password]
Here is a brief description of the options used in the keytool command:
-
-genkey: Requests keytool to generate a key pair
-
-alias: Identifies the new key pair within the keystore
-
-storetype: Declares the type of the keystore. JKS is the default type
-
-keyalg: Declares the algorithm to be used; we're using the RSA public key algorithm, which is the default
-
-storepass: Specifies the password for the entire keystore
-
-keypass: Specifies the password for the new key pair
-
-Validity: Validity of the key pair in days
-
-keystore: File that holds the public and private key pairs
For example, you want to generate the keystore in the directory D:\WorkStudio\keystore, and then the command would look something like:
D:\WorkStudio\keystore>%JAVA_HOME%\bin\keytool -genkey -alias client1 -keystore client1.keystore -keyalg RSA -validity 365 -storepass cl1storepass -keypass cl1keypass
Press the Enter key. The result of the command is as shown in the Figure 1.
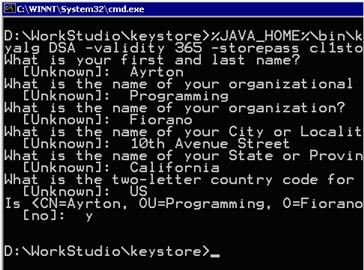
Figure 8: Running the keytool command
You will have to type-in the answers to the questions that appear as shown above. The keystore file is generated in the specified directory. The next step is to create a truststore and add the server certificate in it.
Host Alias
In the above sample, "client1" is host's alias which must be provided while configuring AS2Connector as below:
-
Send operation - value for Alias textbox in Signature Configuration panel.
-
Receive operation - value for Alias textbox in Encrypt/Decrypt Configuration panel.
Getting the Digital Certificate of Partner
Digital certificate contains the public key and are stored in a Truststore(a keystore file). The Truststore is a file where certificates of trusted sites/parties can be retreived for authentication. To generate a truststore, you will have to first export and save the public key of the partner you are going to communicate. Sample is provided below to add certificate to the truststore:
-
Type in the address of the secure website on the address bar of your internet browser. As an example, you may type in https://adwords.google.com. The following dialog is displayed.
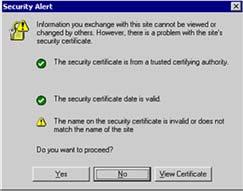
Figure 9:Security Alert dialog
-
Click the View Certificate button. The Certificate dialog is displayed.
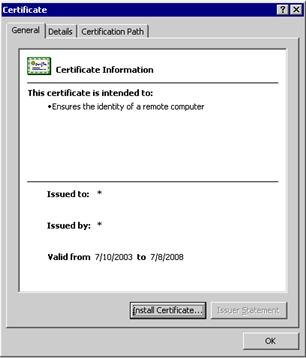
Figure 10: Certificate dialog
-
Click the Details tab and highlight the public key as shown in the Figure IV.
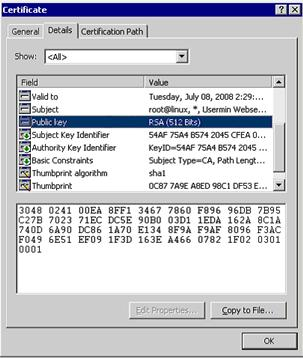
Figure 11: Public Key
-
Next, click the Copy to File button and save the certificate file in the directory where the keystore has been generated as illustrated in the Figure V.
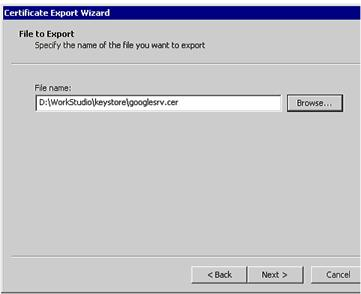
Figure 12: Certificate Export wizard
The process of copying and saving the digital certificate may differ from browser to browser. The concept is however the same. In the guide we have illustrated the process on Internet Explorer.
Once you have saved the digital certificate, you are now ready to create the truststore.
Creating the Client Truststore
Perform the following procedure to create a trust store:
-
Open the command prompt and type in the following command and press Enter:
<Your directory>%JAVA_HOME%\bin\keytool -import -alias [alias name] -file [file name.cer] -keystore [truststorename.keystore] -storepass [storepassname] -
If you want to generate the truststore in the directory D:\WorkStudio\keystore, then the command would look something like:
D:\WorkStudio\keystore>%JAVA_HOME%\bin\keytool -import -alias mailserver -file googlesrv.cer -keystore truststore.keystore -storepass trustpass -
Next press the Enter key. The result of the command appears as below.
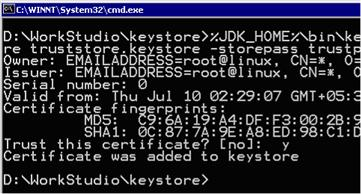
Figure 13: Command Prompt
-
Once the keystore and the truststore have been created, you are now ready to use them in the configuration.
Partner Alias
In the above sample, "mailserver" is partner's alias which must be provided while configuring AS2Connector as below:
-
Send operation - value for Alias textbox in Encrypt/Decrypt Configuration panel.
-
Receive operation - value for Alias textbox in Signature Configuration panel.
Input and Output
Input
The input schema is auto generated for SEND mode based on whether Send connection details from input option is selected or not.
When it is selected, input schema is generated as shown in figure and sample input XML is shown in figure 8 and figure 9.
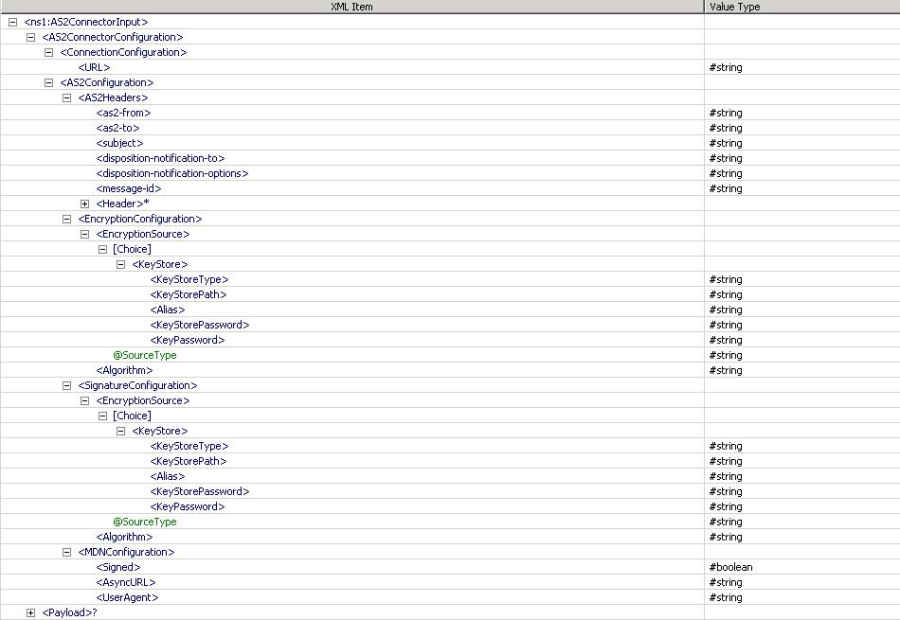
Figure 14: Input Schema when Send connection details from input option is selected
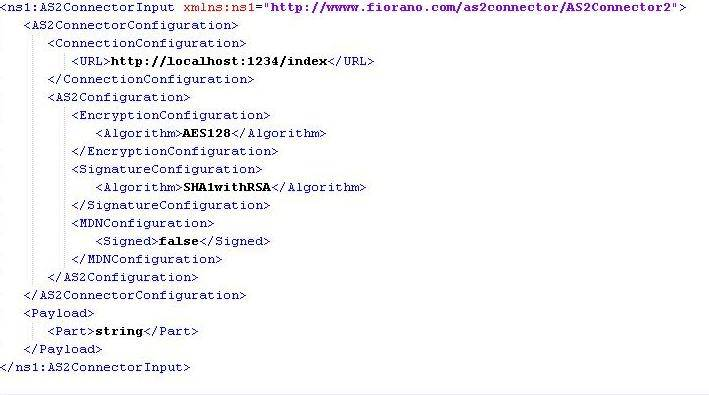
Figure 15: Sample Input XML when Send connection details from input option is selected
When it is not selected, input schema is generated as shown in figure and sample input XML is shown in figure 10 and figure 11.
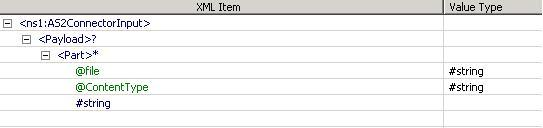
Figure 16: Input Schema when Send connection details from input option is not selected

Figure 17: Sample Input XML when Send connection details from input option is not selected
For all other cases no schema is set on input/output ports.
Functional Demonstration
Scenario 1
Sending AS2 message request and receiving AS2 message.
Configure one AS2connector in SEND mode and another in RECEIVE mode as described in Configuration section. Use a Feeder component to send the message part to AS2Connector configured in send mode and use a Display component to check the response.
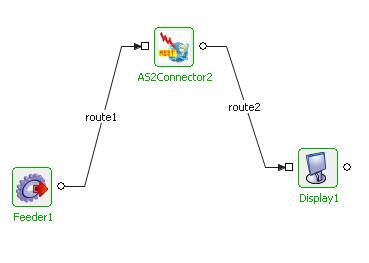
Figure 18: Sample Event Process demonstrating SEND mode.
Connect a Display component to the output port of AS2Connector configured in RECEIVE mode and also the output port of Display to the response port of AS2Connector as shown in Figure 10.
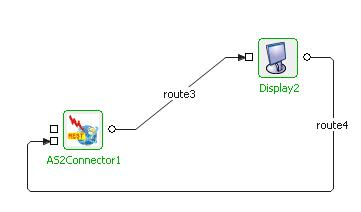
Figure 19: Sample Event Process demonstrating RECEIVE mode
Scenario 2
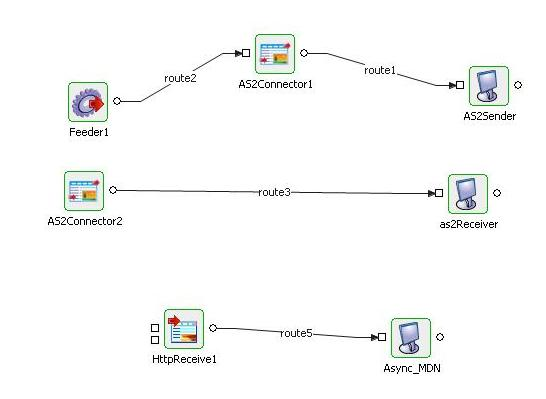
Figure 20: Sample Event Process demonstrating Scenario 2
Encrypting AS2 Message and receiving MDN over different HTTP Connection (async MDN).
Configure one AS2Connector in Send mode, provide encryption details and async URL. Configure another in Receive mode, give decryption details.
Configure HTTPReceive to start on URL provided in async URL.
Sender Configuration
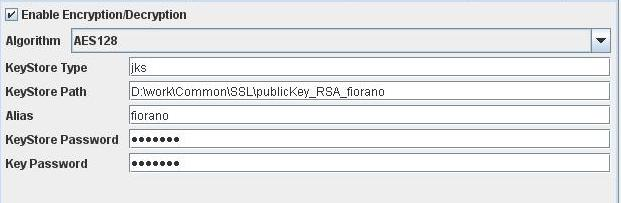
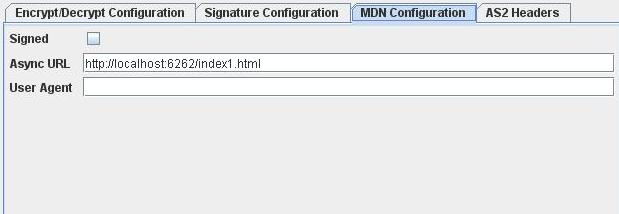
Figure 21: Encryption and MDN Configuration in SEND mode.
Receiver Configuration
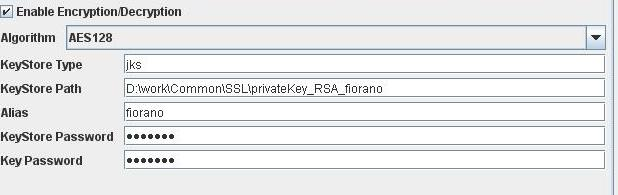
Figure 22: Decryption Configuration in RECEIVE mode
Input : Provide same input as shown in Figure 11.
Output
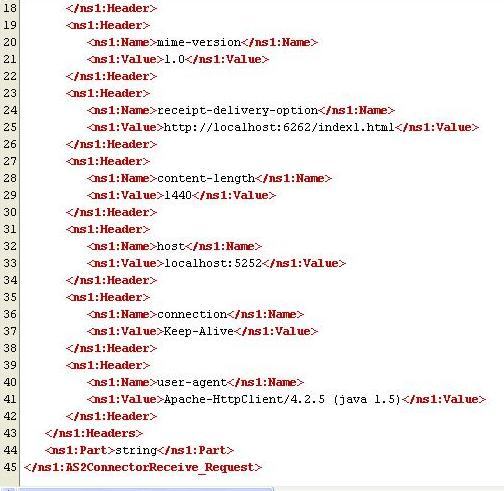
Figure 23: Output Received on AS2Receiver(Display)
MDN Received on output port of HTTPReceive :
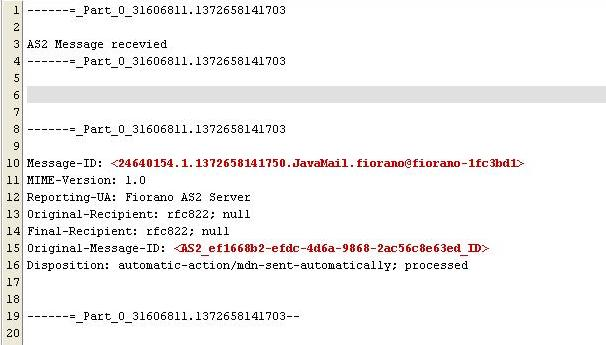
Figure 24: MDN Received on Asyn_MDN(Display)