
C Custom Microservices will, by default, load a NetBeans-based UI in a separate process. To use the eclipse-based eStudio CPS, perform the following actions:
-
Sources generated while creating Custom Microservices will be imported as a new Java Project in eStudio's workspace.
Access the project from the Java perspective in eStudio.
-
By default, the generated component will have a swing based CPS.
To generate an SWT/JFace based CPS, create a new class ConfigLauncher.java in the imported Java project as shown below:
-
Provide the following details in the New Java Class wizard:
-
Name: Name of the class
Example
ConfigLauncher
-
Superclass: The class that can be inherited by other classes
Example
com.fiorano.esb.server.api.service.config.wizard.GenericConfigWizard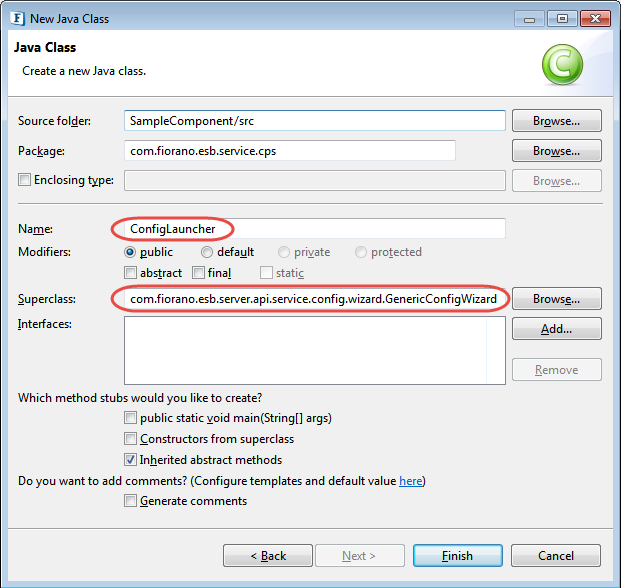
The GenericConfigWizard class provides the basic implementation of the multi-paged wizard which will be launched when the component CPS is launched from an Event Process.
-
-
Add a no-args constructor for the ConfigLauncher.java class as shown in the sample code below.
Sample Code
Javapackage com.fiorano.esb.service.cps; import com.fiorano.esb.server.api.service.config.wizard.GenericConfigwizard; import com.fiorano.esb.service.model.SampleComponentPM; public class ConfigLauncher extends GenericConfigWizard { public ConfigLauncher() { super (SampleComponentPM.class); } @override public void addPages() { super.addPages(); } } -
Before registering the component, the launcher class needs to be changed from the default Property Sheet to the newly created ConfigLauncher. Replace com.fiorano.esb.service.cps.SampleComponentPropertySheet with the qualified name of the ConfigLauncher class (here com.fiorano.esb.service.cps.ConfigLauncher) in the following locations:
-
The value of the field execution > cps > launcher in the resources/ServiceDescriptor.xml file
-
The value of cpsClass in the deploy target in the Common.xml file
-
-
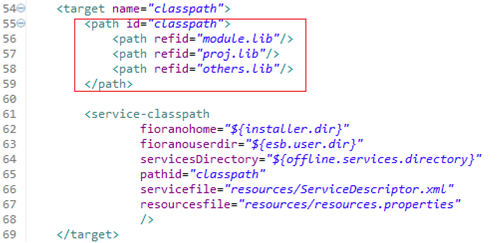
Modify the classpath target in common.xml file as shown below.
-
Register the component by running
ant registerin the component directory and open the CPS from eStudio.Refer the Building and Deploying Service section.