HTTPReceive
The HTTPReceive component acts as an interface between an HTTP client and an Event process, and receives HTTP requests using the Hyper Text Transfer Protocol (HTTP). The request is then converted into an XML Message by the HTTPReceive component and is sent to the event process which in turn processes it and sends the result to the HTTPReceive component.
The HTTPReceive component processes the input in any one of the following ways.
- The Event process processes the input and sends the output to the HTTPReceive component
In this case, the input port of the HTTPReceive component receives the output, converts it into HTTP response and sends it back to the HTTP client through HTTP protocol. - The Event process sends a response error message to the HTTPReceive component
In this case, the error event port of the HTTPReceive component receives the response error through its input event port, converts it into an HTTP response error and sends it to the HTTP client using the Hyper Text Transfer Protocol. - The Event process need not return response
In this case, the HTTPReceive component is preconfigured to the one-way-send mode wherein the HTTPReceive component does not expect and wait for any response. By default, HTTP(S) default response or OK would be returned to the HTTP client for each HTTP request.
The Stream Read Buffer size field should be set only by advanced users as the optimum value depends on specific scenarios in which the component is used.
Configuration and Testing
Configuration
The Component configuration of HTTPReceive can be defined in the Configuration Property Sheet (CPS) as shown in the below figure.
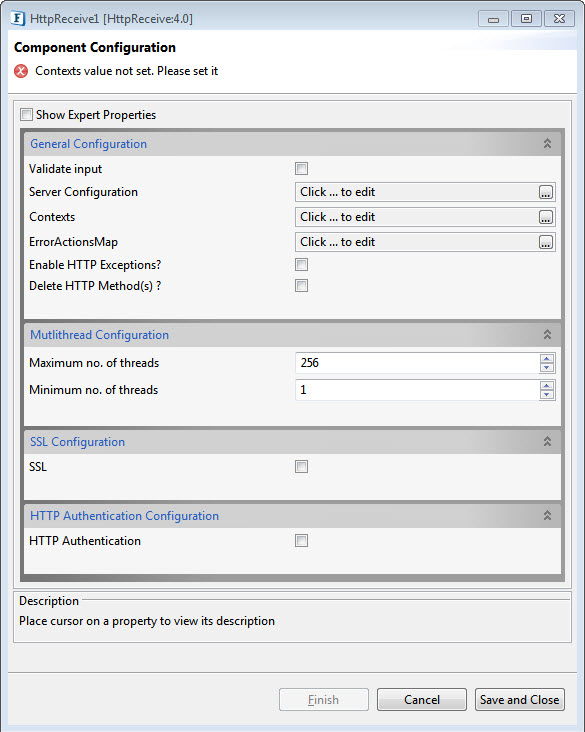
Figure 1: HTTPReceive configuration properties
General Configuration
General Configuration comprises of Server Configuration, Context Configuration, ErrorActionMaps and Input Validation
Validate Input
Please refer the respective section in Common Configurations page.
Server Configuration
Click the ellipsis 
HostName
The host name or the IP address of the system on which the web server is present.
Port
The port on which the web server is running.
Max Idle Time
The maximum time in milliseconds for which the component has to wait for processing the request.
For more details, please refer to https://docs.huihoo.com/javadoc/jetty/6/org/mortbay/jetty/AbstractConnector.html#setMaxIdleTime(int).
Contexts
A Context will encapsulate details of a single HTTP service. Multiple contexts can be configured (added, removed and/or defined) in the dialog box which opens by clicking the ellipsis 
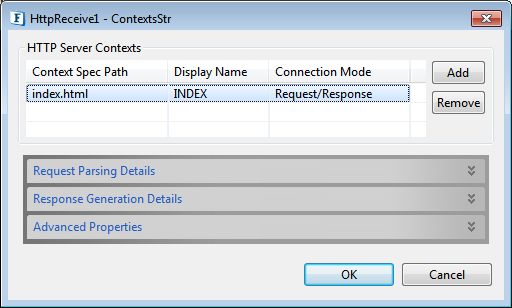
Figure 2: Configuration of Multiple Contexts
HTTP Server Contexts
A Context can be added by clicking on the Add button. For each context added, ports will be added to the component based on the value given in the editable table as explained below.
Context Specific path
The unique context path of the HTTP request corresponding to a context. The path of the context will be computed relative to the server details provided by properties Host Name and Port.
The URI of a context will be http://<Host Name>:<Port>/<Context Spec Path>
Display Name
The unique display name for the context. The names of the ports that are generated corresponding to a context are suffixed by __<Display Name>.
Connection Mode
The connection mode defines the way the client interacts with the server. The client sends the request to the server. The HTTPReceive adapter parses the request and sends it to the event process through output port HTTPRequest__<Display Name> which will be sent to the event process. The behavior of the component after this will be dependant on the connection mode chosen.
- Request/Response
In this mode, the HTTPReceive adapter waits for reply from the event process after sending the request. Two input ports with names HTTPResponse_<Display Name> and ERROR_<Display name> will be created for receiving response and error messages respectively. Then the component handles the response based on the response generation details provided for the context.
- One Way Send
In this mode, the HTTPReceive adapter will send a default response, HTTP(S) default response/ OK back to the HTTP client after sending the request message to the event process. No input ports will be created in this case for this context.
When a context is selected the details of handling the request and response can be configured using the tabs Request Parsing details and Response generation details.
Request Parsing Details
The HTTP Request stream received by the component when a client sends request will be parsed based on the details provided in this tab. The UI has three tabs at the bottom which define various types of request parsing details as shown in the below figure.
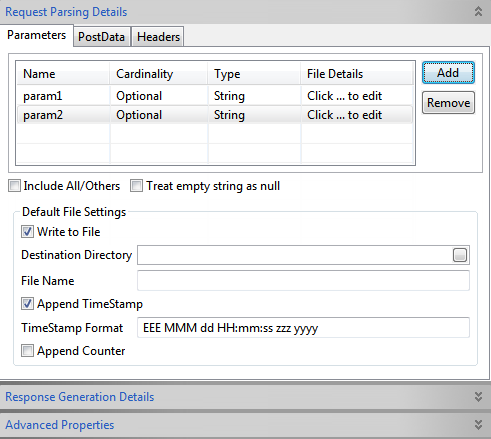
Figure 3: Configuration of Request Parsing Details
When an HTTP request is received by the component, it is transformed into a JMS message and sent to the event process through the output port of the component based on the details configured using this property. Schema of the output port HTTPRequest_<Context Display Name> will change based on the details provided for this property.
Parameters
Parameters define the characteristics of the HTTP request data stream being parsed for converting the request to message. Parameters can be added by clicking Add button in the parameters tab in request parsing details tab. Added parameters can be removed by clicking on the Remove button. For each parameter added a new element will be added as child of Params element in the schema of the corresponding output port based on the following details.
Name
The name of the parameter that is passed in the request. The name for corresponding element in the output schema will be set to this value.
- Cardinality
The options are Optional and Required. If a parameter is definitely necessary for the processing of a request, then choose 'Required', otherwise 'Optional' must be chosen. The cardinality of the corresponding element in the output schema will be the same.
- Type
Specifies data type of he parameter can be specified here. The XSD type of corresponding element in the output schema will be same.
Data types available are:- String
- Integer
- Decimal
- Boolean
- File
- File Details
When you choose the Type as 'File', the button present under this column becomes active, clicking on which it opens the below dialog box:
Refer the sections below for description as it works in the same manner.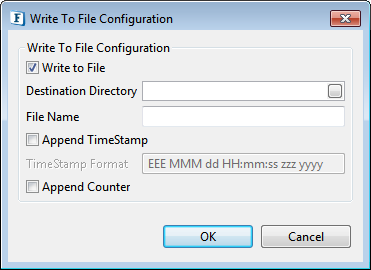
Figure 4: Write to File Configuration dialog box
- Include All/Others
If this option is selected, parameters from the request that are not defined as parsing parameters will also be added in the output message. These will be added under the Params element in the output schema. - Treat empty string as null
If this option is selected, and the content of this parameter in HTTP Request stream is empty, the parameter will be considered as null otherwise it will be considered as an empty string.
Default File Settings
If the param is of File data type which is generally used in multipart/form-data request, details regarding whether the file attachment should be saved or not are to be entered here.
- Write to File
Select this option to write request attachments to file, if not selected attachments will be sent to output port. While sending to output port, Attachments will be base64 encoded if they does not contain text content.
- Destination Directory
Provide the path of the Directory in which attachments needs to be saved.
- File Name
Specify the file name in which corresponding file param attachment needs to be saved.
- Append TimeStamp
Select this option to append time stamp to the file name while writing attachments to file.
TimeStamp Format
Specify the time stamp format to be appended to the file name.The default time stamp format is "EEE MMM dd HH:mm:ss zzz yyyy". In case of deploying the component on a windows operating system, when timestamp of the aforementioned format is appended to the filename, an exception is thrown because windows OS does not allow colon (:) in its file name. Hence please use a timestamp format devoid of such characters forbidden for use in file names by windows.
- Append Counter
Select this option to append a counter to the file name in case a file with the same name exists. If Is Append TimeStamp is also enabled then time stamp will be appended before appending counter.
Example: fileName_0(with out time stamp), fileName_1313406444699_1(with time stamp)
Post Data
If data is relatively large and is to be posted from the request, the way it has to be parsed must be specified by selecting the Post Data tab in the request parsing details tab.
Parse Post Data
The data to be posted by the client can be one of the following types.
-----------
This option must be specified when data is not posted as part of the request. If chosen, post data, if passed as part of the HTTP request will not be present in the request message. In this case parameters or headers must be compulsorily included.Use this option if you know that there will be no data posted over the request stream via HTTP.
- XML Text [Provide an XSD for the XML text]
This must be chosen if the data posted is XML that conforms to a schema. The schema can be provided using the XSD editor as shown in the below figure. If parameters or headers are specified then an element XMLData will appear in the schema of output port whose type is same as that of the provided schema. Otherwise, this schema will be set as output port schema.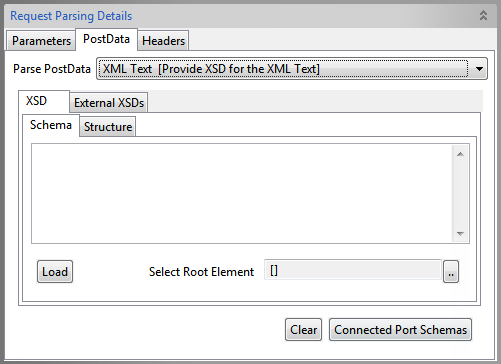
Figure 5: Configuration of Post Data in Request Parsing Details
- Simple Text
If data from the request stream is text not conforming to any schema. This option can be selected if the data need not be transformed using Fiorano mapper and needs to be transferred as is. If parameters or headers are specified, an element Data of string type will appear in the schema of output port and the text will be inserted as CDATA. Otherwise it will be set as message text.
- Bytes
Data from the request stream will be filled as bytes in the JMS Message. Use this option in case you need to send media files as binary data via HTTP.
Headers
A Header is a part of a data stream which specifies information about the data stream. This option is used to specify the type of information being sent across the data stream.
Headers can be added by clicking Add button in the Headers tab. Added Headers can be removed by clicking the Remove button. For each Header added, a new element will be added as child of Headers element with attributes Name, Cardinality and Type similar to Parameters.
Fill Defaults
This button can be used to include the default headers as shown in the Table1 belowName Cardinality Type Scheme Optional String Version
Optional
String
IsCommitted
Optional
String
Host
Optional
String
Port
Optional
String
EncodedPath
Optional
String
Method
Optional
String
Connection
Optional
String
Pragma
Optional
String
Content-Length
Optional
String
Content-Type
Optional
String
Cookie
Optional
String
Table 1: Default headers and their data types
- Include All/Others
If this option is selected, all headers from the request stream are included in the message from the output port. The headers will be added under Headers element.
Response Generation details
If the context connection mode is chosen as Request/Reply, the component sends the request message and waits for response from the event process. The response message that is received on input port HTTPResponse__<Context Display Name> is converted to HTTP Response stream suitable for the invoking client based on the details provided here.
To provide the details, go to the Response Data tab under the Response Generation Details section.
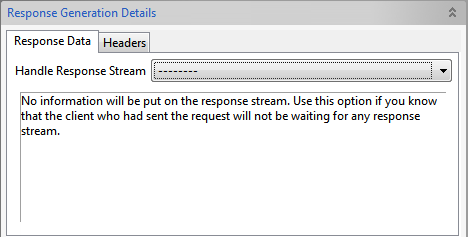
Figure 6: Response Generation Details – Response Data
Response Data
- -----------
When this option is used, no information is put on the response stream. - Simple Text
Text portion of the JMS Message will be read and put in the response stream. This option can be chosen when the invoking client does not expect a response that conforms to a specific schema. No schema is set on the input port RESPONSE.
- XML Text [Provide an XSD for the XML Text]
If the client expects the response to be compliant to a particular schema, then the schema must be provided using the schema editor. The schema will be set as schema of the input port RESPONSE.
- Bytes
If the client expects the response to be compliant to a particular schema, then the schema must be provided using the schema editor. The schema will be set as schema of the input port RESPONSE.
Headers
This option is used to specify the type of information being sent across the response stream. Headers can be added by clicking Add button in the Headers tab. Added Headers can be removed by clicking on the Remove button. For each header added, a new element will be added as child of Headers element in the schema of the input port with attributes Name, Cardinality and Type similar to Parameters in Request Parsing Details.
- Fill Defaults
This is used to include all default headers in the response message. Please refer to Table 1 above for default headers details.
- Handle All
If this option is selected all headers that are present in the response received from the event process will be added as headers in the response stream.
Advanced Properties
The advanced properties for a context can be configured by clicking on the Advanced Properties button in context details panel. These properties depend on the connection mode between the adapter and the client.
Request/Response Connection Mode
If the Connection Mode of the adapter is 'Request/Response', the corresponding Advanced Properties will be as below.
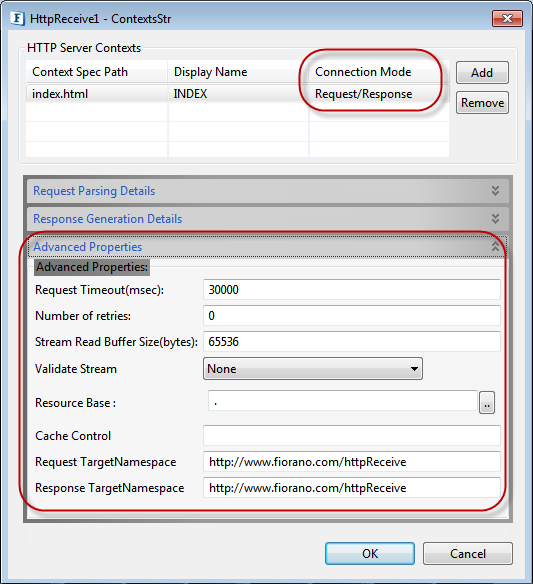
Figure 7: Advanced Properties : Request/Response Connection mode
- Request TimeOut (msec)
It is the length of time in milliseconds which the HTTP Receive adapter will wait for the response message.
- Number of Retries
It is the number of times adapter will retry in case there is no response.
- Stream Read Buffer Size (Bytes)
It is the size of the buffer that will be used to read an HTTP request stream.
- Validate Stream
Validates the request and response stream based on the schema generated. It has the following options
- Both Request and Response Stream: Validates both the request and response streams
- Only Request Stream: Validates only request stream
- Only Response Stream: Validates only response stream
- None: No validation is done for request and response streams
- Resource Base
Location of the resource that contains the static content like images, css and so on. This can be any valid path in the file system (may also be relative to %FIORANO_HOME%\runtimedata\PeerServers\<profile-name>\FPS\run\components\HttpReceive\4.0) or a web URL. The resources present in resource base will then be hosted in URLs of the form http://<hostname>:<port>/<contextpath>/<resource>
- Cache Control
The cache control mechanism that is to be used to cache the static content. For example, cache control value "max-age=3600,public" states that static content would be cached for up to an hour and shared between all users, without checking the server. For valid Cache-Control values, please refer to http://www.w3.org/Protocols/rfc2616/rfc2616-sec14.html#sec14.9
- Request TargetNameSpace
The target name space for the schema generated for the output port HTTPRequest_<Context Display Name>.
- Response TargetNameSpace
The target name space for the schema generated for the input port HTTPResponse_<Context Display Name>.
One Way Send Connection mode
If the Connection Mode is 'One Way Send', the following properties can be configured under Advanced Properties.
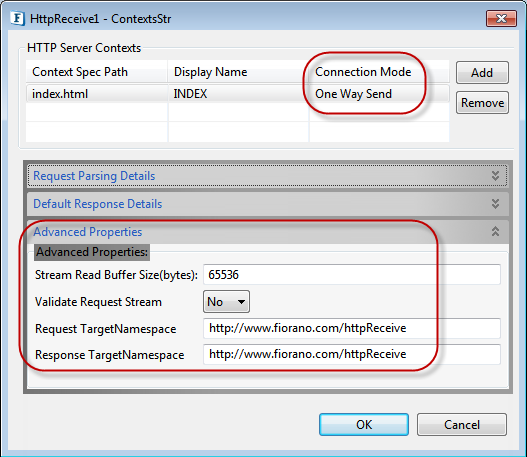
Figure 8: Advanced Properties : One Way Send
For description of these properties, refer to the section of Advanced properties for Request/Response connection mode.
ErrorActionsMap
The suitable actions that have to be taken for possible errors that might happen while the component is running can be specified using the ErrorActions Map editor, by clicking on the ellipsis 
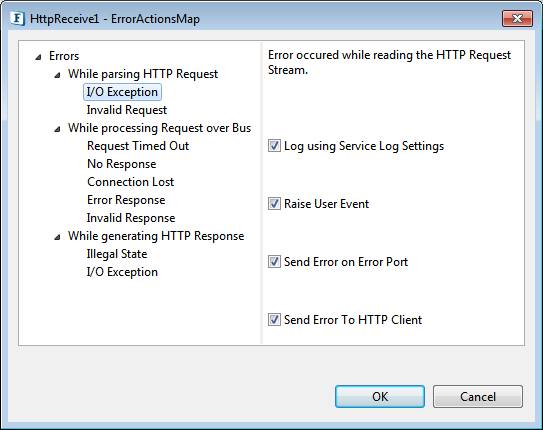
Figure 9: Configuration of Error Actions Map
The various options for handling errors that might occur while sending or receiving data streams can be configured. The various instances when an error might occur are as follows:
While parsing HTTP Request
These errors may occur while parsing the HTTP request.
- [1001] - I/O Exception: This error may occur while reading the HTTP Request Stream
- [1002] - Invalid Request: This error may occur when HTTP Request does not match with the configured Format.
While processing Request over Bus
These errors may occur while processing the request over the bus.
- [2001] - Request Timed Out: This error may occur when the request is timed out.
- [2002] - No Response: This error may occur when there is no response.
- [2003] - Connection Lost: This error may occur when the Connection to Peer Server is lost while sending Request Document over the Bus.
- [2004] - Error Response: This error may occur when the Response received from the Bus contains one or more errors.
- [2005] - Invalid Response: This error may occur when the Response does not match with the configured Format.
While Generating HTTP Response
These errors may occur when the HTTPReceive adapter is generating the HTTP Response.
- [3001] - Illegal State: This error may occur while setting HTTP Response Headers.
- [3002] - I/O exception: This error may occur while sending data over the HTTP Response Stream.
Various remedial actions can be specified for each of the above-mentioned errors to handle the errors effectively. The remedial actions that are displayed in the Error Handling panel are as follows:
Log using service log settings
The error is logged using the settings for the business service. These settings can be changed by using the properties view of the component.
Raise User Event
The error is logged as a user event.
Send Error on error port
The error is sent to the error port of the component.
Send Error to HTTP client
The error is sent to the HTTP client invoking the service.
Timed out Message
This is an expert property that will be displayed by clicking the button show Expert Properties in the CPS. The message that has to be sent to the client invoking a context when the request sent gets timed out.
Enable HTTP Exceptions?
After enabling this property, every exception encountered gets wrapped into an HTTP exception.
Delete HTTP Method(s)?
Enable this property to disable/block HTTP methods.

Figure 10: Property to block HTTP Methods
HTTP Method(s) Name
After enabling the Delete HTTP Method(s)? property, provide the HTTP method to be disabled in the text box.
Multiple HTTP Methods can be provided separated by commas.
Example:
DELETE,POST
Expert Properties
Enable the Expert Properties view to configure these properties.
Expert properties are meant for advanced users; use with caution.
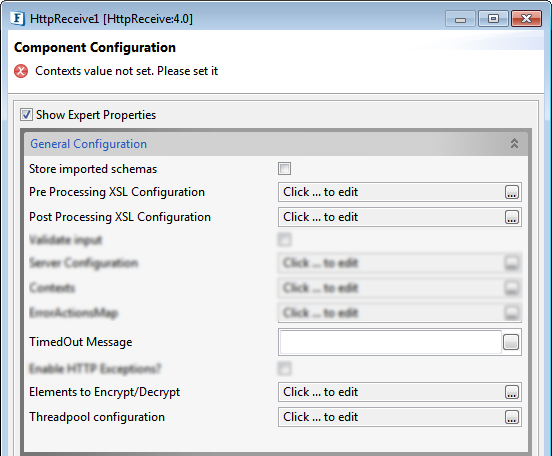
Figure 11: Expert properties for HTTPReceive
Store Imported Schemas
Enable this to save the imported schemas into Schema Repository.
Pre Processing XSL Configuration
Pre Processing XSL configuration can be used to transform request message before processing it. Click the ellipses button against the property to configure the properties.
Refer to the Pre/Post Processing XSL Configuration section under the Common Configurations page for details regarding Pre Processing XSL configuration and Post Processing XSL configuration (below).
Post Processing XSL Configuration
Post Processing XSL configuration can be used to transform the response message before sending it to the output port.
Timedout Message
Specify the message that needs to be sent to HTTPClient upon timeout.
Elements to Encrypt/Decrypt
Select elements to encrypt in the Output message.
Refer to the Encrypt Decrypt Configuration section in the Common Configurations page for details.
Threadpool Configuration
This property is used when there is a need to process messages in parallel within the component, still maintaining the sequence from the external perspective.
Refer to the Threadpool Configuration section under the Common Configurations page for details.
Multithread Configuration
This section comprises of properties that define the number of threads that have to be present in a Thread Pool.
Maximum No of Threads
A thread pool ensures threads are used efficiently within the container. A number of threads are created at initialization and placed in the pool. When there is work to be done, for example, to service a request, a free thread from the pool is allocated and then returned to the pool when the work has been completed.
If the maximum pool size is reached, jobs wait for a free thread
Minimum No of Threads
The minimum number of threads that have to be present in the thread pool. Idle threads in the pool will timeout and terminate until the minimum number of threads are running.
SSL Configuration
Select this option to enable SSL Settings; adjoining properties for SSL security configuration gets displayed.
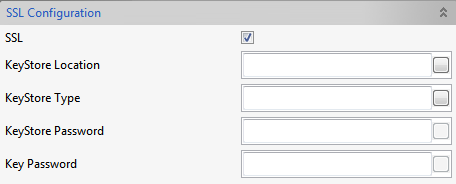
Figure 12: SSL configuration properties
Property | Description |
| Key Store Location | Location of the key store file. The KeyStore is used by the component for client authentication. |
| Key Store Type | Type of the Key Store whose location is specified by Key Store Location. For Java keystore file format, this property has the value jks (or JKS). You do not normally specify this property, because its default value is already jks. |
| Key Store Password | Password to access the private key from the keystore file. |
HTTP Authentication configuration
Enable HTTP Authentication property to configure the same.

Figure 13: HTTP Authentication enabled
HTTP Authentication
If HTTPAuthentication needs to be enabled for server hosted, then under user details give the list of credentials.
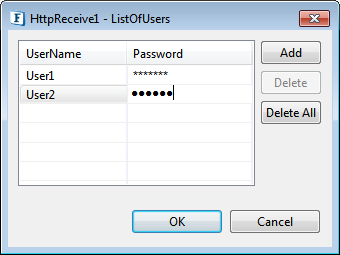
Figure 14: HTTP Authentication dialog box
List of usernames and corresponding passwords that are required to authenticate via Basic mode can be given as shown in the above figure
Setting response status
Response status code and message can be set using message properties http_status_msg and http_status. But in case of unauthorized error, that is, 401, response maintains default error than the set value.
For example, using javaScript adapter, these properties can be set as described below :
document.getRecord().setStringProperty("http_status_msg","Successful")document.getRecord().setStringProperty("http_status","999").
Input and Output
Input
The input schema is auto-generated based on the configuration of Response Generation Details provided for the context as described under Response Generation Details.
Handle Response Stream in Response Data set to either '------' or 'Bytes'
When Handle Response Stream in Response Data is set to either '------' or 'Bytes', and no headers are configured, then no schema is set on the input port RESPONSE.
If headers are configured as shown in the below figure, the corresponding input schema generated and the sample input XML are as shown in the subsequent figures.
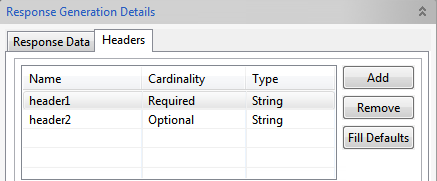
Figure 15: Sample Configuration of Response Generation Details – Headers.

Figure 16: Sample Input Schema when headers are configured.

Figure 17: Sample Input XML for schema shown in Figure 13
Handle Response Stream in Response Data set to 'XML'
When Handle Response Stream in Response Data is set to XML and headers are configured as shown in Figure 12, the corresponding input schema generated and the sample input XML are as shown in the subsequent figures.

Figure 18: Input port Schema when Response data is XML
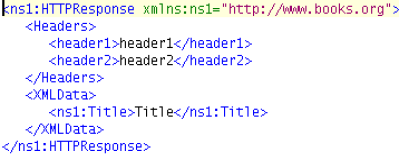
Figure 19: Sample Input XML for schema shown in Figure 13
The schema provided in Response data is set under XMLData element in input port schema. If headers are not configured, then this schema is directly set on the input port.
Handle Response Stream in Response Data set to 'Simple Text'
When Handle Response Stream in Response Data is set to Simple Text, and headers are configured as shown in Figure 12, the corresponding input schema generated and the sample input XML are as shown in the subsequent figures..

Figure 20: Input port Schema when Response data is Simple Text
Output
The output schema is auto-generated based on the configuration of request parsing details provided. If parameters are also provided, then the schema is a concatenation of the parameters and the schema provided. The schema is purely generated in case only parameters are provided.
Post Data in Request Parsing details set to either '------' or 'Bytes'
Configure headers as shown in Figure 12 in Request details and parameters as shown in the below figure.

Figure 21: Sample Input XML for schema shown in Figure 14
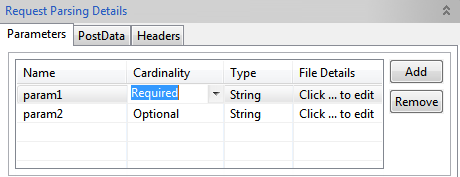
Figure 22: Sample Configuration of Request details – Parameters
For the above configuration, schema set on output port RESPONSE and sample XML are shown in the following figures respectively.
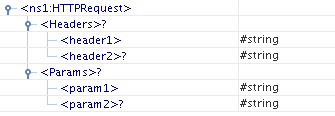
Figure 23: Output Schema with parameters and headers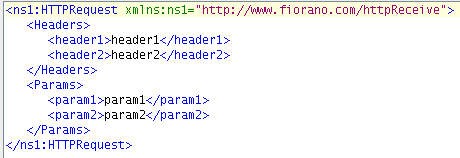
Figure 24: Output XML for schema shown in Figure 17
When Post Data is set to Bytes and if no headers and parameters are configured, then no schema is set on the output port. When Post Data is set to '-----' , configuration of parameters is mandatory, at least one parameter should be configured.
Post Data in Request Parsing details set to 'XML'
Output schema is defined as shown in the below figure.
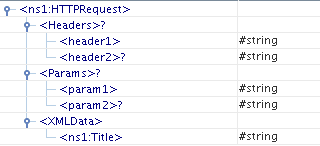
Figure 25: Output schema when Post Data set to 'XML'
Sample XML for the above schema is as in the below figure.
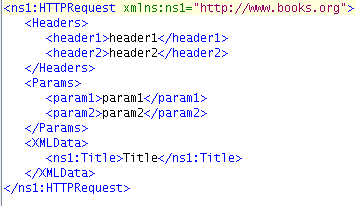
Figure 26: Output XML for schema shown in Figure 19
Schema which is provided in Post Data is set under XMLData of output schema. If no headers and parameters are provided, the schema provided is directly set on the output port.
Post Data in Request Parsing details set to 'Simple Text'
If the parameters are defined as shown in figure 19 and headers configured as shown in figure 12, then the corresponding output schema and sample XML are as shown in the subsequent figures below.
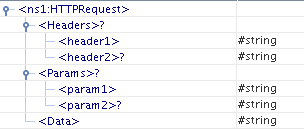
Figure 27: Output schema when Post Data set to 'Simple Text'
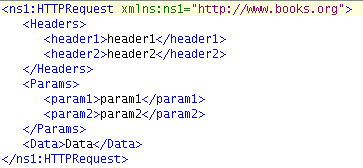
Figure 28: Output XML when Post Data set to Simple Text
When Post Data is set to Simple Text and if no headers and parameters are configured ,then no schema is set on the output port.
Functional Demonstration
Scenario 1
Receiving an HTTP request and returning the parsed request as response.
Follow the below steps to demonstrate the above:
- Configure the HTTP Receive adapter as described in Configuration section. Add two parameters 'REQUEST' and 'CREDENTIALS' in Request Parsing Details.
- Connect a Display component to its output port and also the output port of Display to the response port of HTTP Receive as shown in Figure 24.

Figure 29: Sample Event Process demonstrating Scenario 1
- Open %FIORANO_HOME%\esb\samples\EventProcesses\PurchasingSystem\resources\PurchasingSystem_Input.html in web browser. The web page looks as in the below figure. Click the Submit button to send the HTTP request. Check the port number by editing the html page , it should be same as provided in the component CPS.
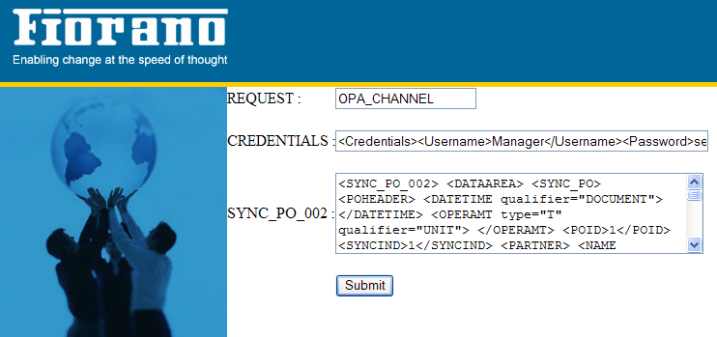
Figure 30: Sample HTTP Request
HTTPReceive picks the parameters 'REQUEST' and 'CREDENTIALS' as configured in the Context details and sends the same XML back to the web page. Below figure shows the response sent by HTTP Receive.
Figure 31: Response sent by HTTPReceive adapter
Use Case Scenario
In the Purchasing System sample Event Process, the purchase details submitted from the web page are received using the HTTP Receive component.
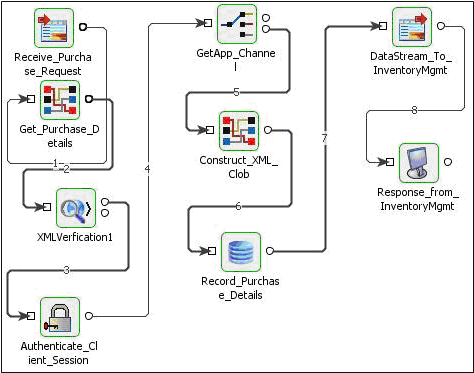
Figure 32: Event Process flow for the Use Case Scenario
Useful tips
The error ports of the components that receive the HTTP request through HTTP Receive could be connected to the Error port of HTTP Receive to report errors.
