Configuring Microservices
Most components have a set of configurable parameters which can be set to appropriate values to customize instances of the component for a particular Fiorano application. Configuration is captured within a configuration property sheet (CPS) as described in the following sections.
CPS for Component Instance Configuration
Most components have a GUI-based Configuration Property Sheet (CPS). This is usually a dialog or wizard which has a list of configurable parameters for the component. These customizable parameters have their own editors to facilitate the end user in adding appropriate values.
Launching the CPS
Right-click the component and select the Configure option from the menu list or double-click the component to open the CPS
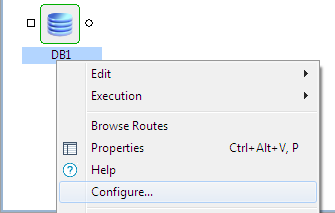
Figure 1: Launching the CPS
Figure below illustrates the loaded CPS of a DB component as an example.
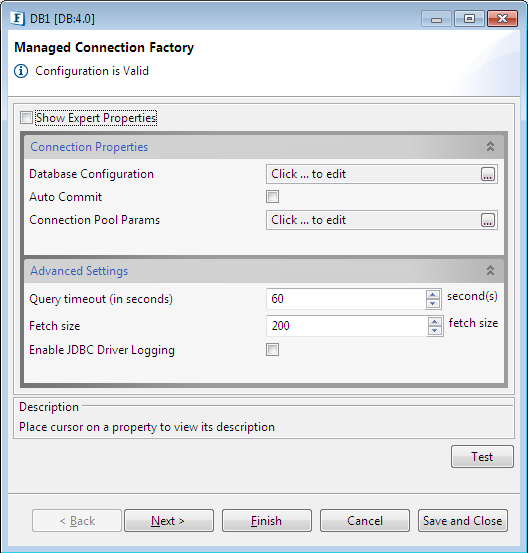
Figure 2: A typical CPS
Customizable and Expert Properties
One component's customizable properties are typically different from that of the other. Some properties are hidden by default and are shown only when the Show Expert Properties checkbox is selected. These are a set of advanced properties that are specific to the particular component instance.
You can see additional properties highlighted in figure below, which are advanced properties which are not visible in Figure 6.
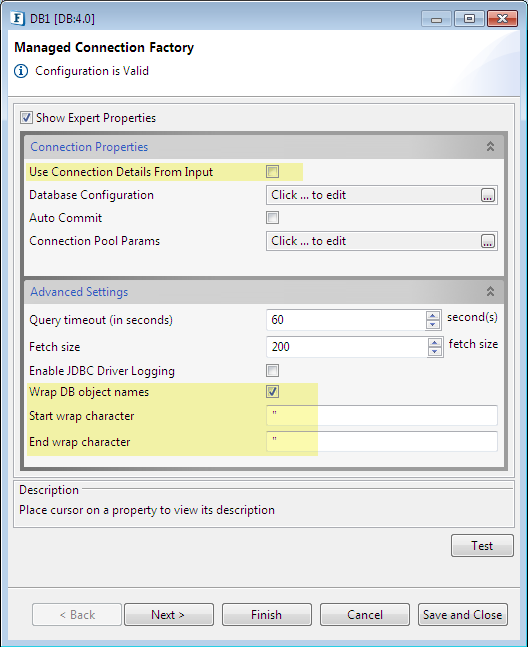
Figure 3: CPS with Expert Properties enabled in DB CPS
When a CPS is closed by clicking the Finish button, the configuration is persisted as part of the Fiorano application. This is later made available to the component at runtime via JNDI lookup.
Component Help
Apart from this Online Help, component help is available attached to the components as well; select the component and press F1 to open the Component Help.
Other the the entire help content, description for a selected property appears under the Description section (see the figure above) present at the bottom of the each CPS panel.
Runtime Arguments
On selecting a component in the Fiorano eStudio, the runtime arguments for the component are displayed in the Properties window (as shown in the figure below). These runtime arguments can be accessed within the component at runtime through the parameters passed to the component when launching it using a launcher. A standard runtime argument added for all Java components is "JVM_PARAMS". This captures the JVM parameters which the end user might want to pass when the component is launched as a separate process. Runtime arguments for a component can be added using the Fiorano eStudio.
If the component's launch mode is changed to 'In Memory', the JVM_PARAMS property will not be displayed in Properties view. To use the properties passed as JVM_PARAMS for an InMemory launched component, these properties need to be added to peer server's configuration file under <java.system.props> tag before starting the peer server. Peer server's configuration file can be located as either $FIORANO_HOME/esb/server/bin/server.conf or $FIORANO_HOME/esb/fps/bin/fps.conf depending on the script being used to run the peer server.
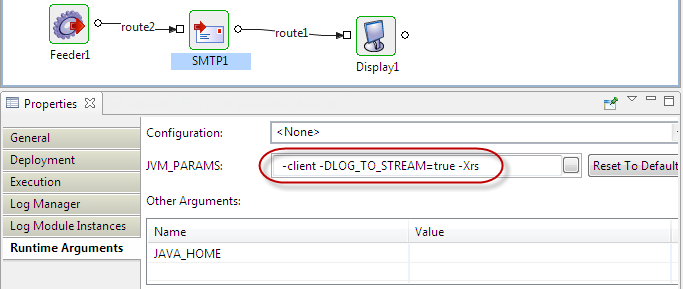
Figure 4: Fiorano eStudio showing runtime arguments in properties window
For details about the run time properties (properties in Properties panel), refer Common Configurations section.
Component Dependencies and System Libraries
Every component has a set of dependencies on various libraries such as JAR files, DLLs, property files, configuration XML or any file which the component would require either at configuration time or at runtime. Fiorano already provides some standard libraries (some of them being Third Party), which can be directly added to the list of dependencies for a component. If there is a library which is needed only for a particular component, it can be added exclusively for that component, which is explained further.
Microservice Repository helps to add dependencies to an existing component as shown in Figure 5 and explained in more detail later in this section. You can right-click the component for which you need to add a dependency and select Edit (as shown in Figure 6 and 7). The dialog shows two sections:
- The first section is where you add dependencies which are applicable only for a particular component. A copy of the dependency library is kept with the component.
- The second section is where you add dependencies which are already registered with Fiorano. These are called system libraries. In this case a copy of library is not added the component. There is reference created in the component to locate where to find the dependency library files.
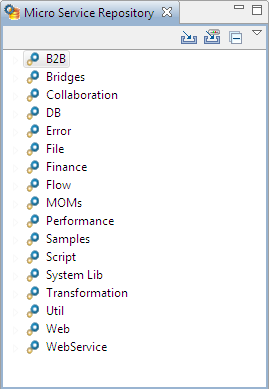
Figure 5: Explorer view of Fiorano eStudio showing the component repository
Viewing the Resources of a Component
To view the resources of a component, right-click on the component and choose Edit from the drop-down menu.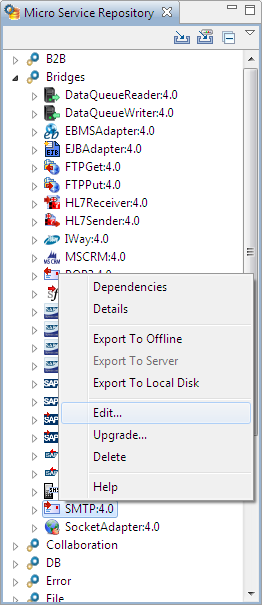
Figure 6: Using the Edit option to add resources using the Fiorano Studio
In the ServiceDescriptor.xml window, the Deployment section (last tab present at the lower-left part of the screen) carries the resources and dependencies of the SMTP component as an example.
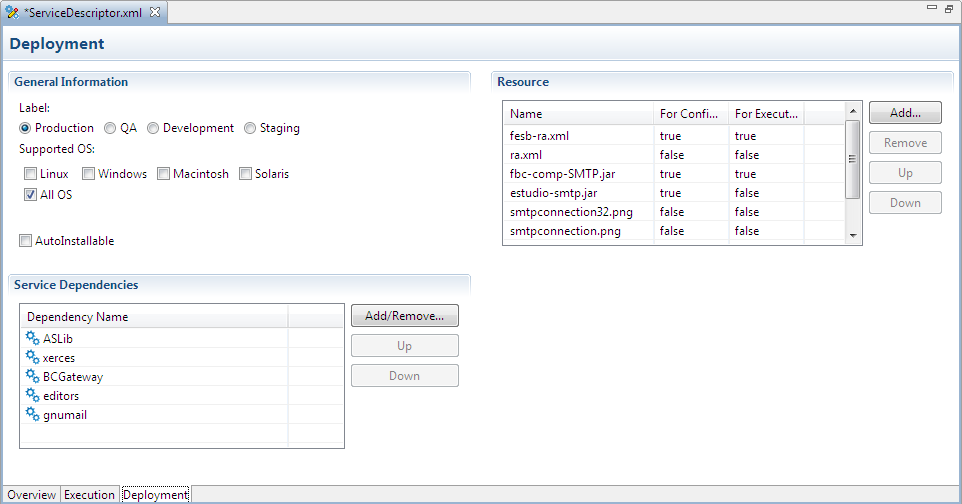
Figure 7: List of dependencies and resources of SMTP component
Add New Library Dependencies
There are system libraries which are already registered with the Fiorano Enterpriser Server as dependencies to each service/component. New dependency libraries and resources can be added as mentioned in the below sections.
Adding Service Dependencies
To add a Service Dependency to a particular component from the dependencies already registered with the Fiorano Enterprise Server, click Add/Remove button present under Service Dependencies section (see Figure 14 above). This gives a list of exiting services from which dependencies can be added.
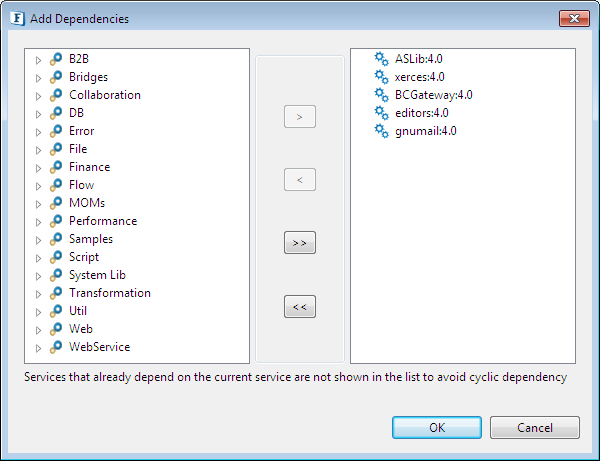
Figure 8: List of dependencies that can be added to the existing dependencies of the component
The following table lists the system libraries developed by Fiorano to use within component implementations.
This does not include any Third party libraries.
Service Dependency | Jar File Name | Description |
|---|---|---|
CompositeComponentEngine | cce.jar | Implementation for the BPEL process. |
CompositeComponent | fbc-comp-CompositeComponent.jar,fesb-comp-CompositeComponent.jar | Component for execution of BPEL process. |
BCCommon | bcc.jar | Common classes required by components. |
BCEngine | bce.jar | TrGateway(Transport Gateway for BCs) and BCDK (Abstract Implementation for all the BCs) |
BCGateway | fesb-comp-bcgateway.jar | EDBC wrapper for BC components over JMSGateway |
customEditors | fbc-comp-customEditors.jar | Editors to be used in CPS to capture properties like SchemaEditor(XSD,DTD),ErrorPanels(ErrorConfiguration), SSL Panels(SSLConfiguration) and so on. |
Jdbc | fbc-comp-jdbc.jar | Classes which handle Database specific jdbc operations |
Framework | Framework.jar | LicenseManager,Swing,xml(dom,sax,saxon,xsd related) classes |
TifosiJavaRTL | TifosiJavaRTL.jar | Filechooser,wizard,xsdanddtd parsersupport,tifosihelpbroker classes. |
esbCustomEditors | fesb-comp-esbCustomEditors.jar | Editors (which are specific to Fiorano ESB) to be used in CPS. |
FioranoJavaRTL | fmq-client.jar,fmq-rtl.jar | JMS implementation classes of FioranoMQ. |
Dmlparser | fbc-comp-dmlparser.jar | Parser for DML (Data Manipulation Language: insert,delete,update and select) statements. |
FileMatcher | fbc-comp-filematcher-api.jar,fbc-comp-filematcher-local.jar | Classes required for searching file/directory names based on filename pattern. |
Transformer | fbc-comp-Transformer.jar | Transformer engine classes for converting |
Adding New Resource
To add new resources to a component, click Add button present under Resource section (see the figure above) and select the file from the location where it is saved.
Please refer the Adding Resources to a Microservice section to know how to add resources to class path.
- To add a new resource, it needs to be downloaded and saved in a specific location.
- All the resources added to a service will go into its corresponding class path.
Component Classpath Generation
- Add Component_Home directory, a Depth First Traversal of the dependency tree of component is carried out.
- All resources of the leaf node of dependency tree added in the following fashion:
- If the dependency directory contains any required resource other than java archive such as jar/zip, the directory is added; then, all available java archive files are added
- At the end, the fmq client jar, the licenses dir, the xml-catalog dir and the server profiles dir is added.
Example:
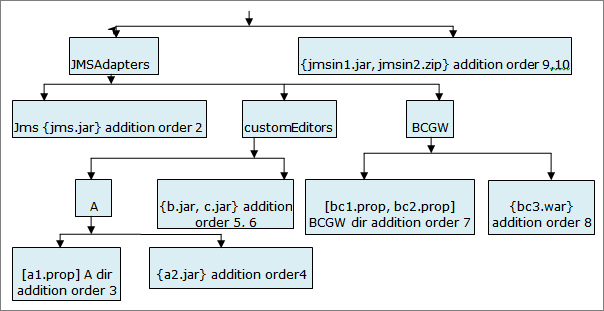
Figure 9: Component Classpath Generation example
.../fmq-rtl.jar (addition order 11)
.../licenses (addition order 12)
.../xml-catalog (addition order 13)
.../esb/server/profiles (addition order 14)
Legend:
- {} – enclosed elements are all java archives
- [] – enclosed elements are all non-java archives like .properties file etc.
- The order of dependencies is as shown in Service Editor in Studio.
- If the component needs some library and the peer server has some version of said library already present in its classpath, the Component should be run in separate Process to prevent class loader issues with peer.
- If multiple version of some library is being added in the component classpath, as per java classpath rules, the version appearing earlier would be used for finding any required class.
Creating New Service Component
A new library/service can be added using the Fiorano eStudio tool, using the Create Service Component option from Tools menu. Provide the details as mentioned in the wizard and click Finish to create a new system library.
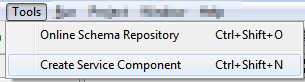
Figure 10: Option to create new service under Tools menu
Please refer the Creating Microservices from Fiorano eStudio section to know how to add a new service component.
Configuring Logging Parameters
For every service component, the log settings can be configured in the Properties window. For a chosen service instance, the log settings are available under the categories Log Manager and Log Module Instances.
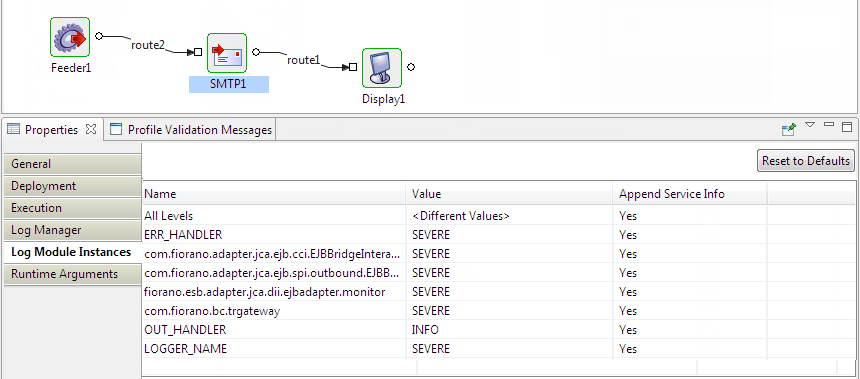
Figure 11: Log Module Instances
For every log module, the log level can be configured from the drop down list. The different log levels at which the details can be logged are Severe, Warning, Info, Config, Fine, Finer, Finest and All.
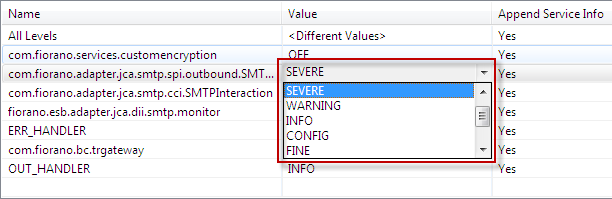
Figure 12: Log levels
Severe is the highest logging level and All the lowest. A log module accepts all messages that are logged at the levels greater than or equal to the configured level. That is, if the configured log level for a log module is Severe, only the messages at Severe level is logged. If the specified level is Info, the messages at Info, Warning and Severe is logged. Specifying All logs the messages at all levels.
Messages of all log modules logged at Severe/Warning level appear in Error Logs of the component. Messages at the remaining levels appear in Out Logs.
Log handlers can be configured in Log Manager as shown in the figure below.
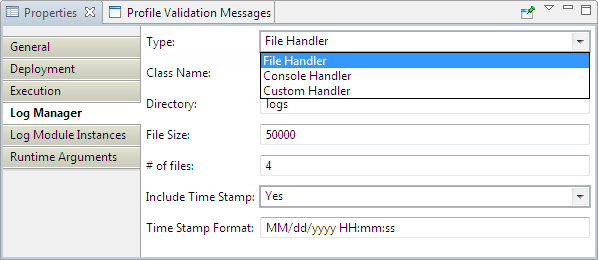
Figure 13: Configuring Log Handler
File Handler: When the log handler is a File Handler, the logs are written to files.
Example: When an event process named 'Logging' is created and run, a directory LOGGING is created at <FIORANO_HOME>/runtimedata/PeerServers/<profile>/FPS/run/logs which in turn contains a folder for every service instance. These folders contain the files for out and error logs.
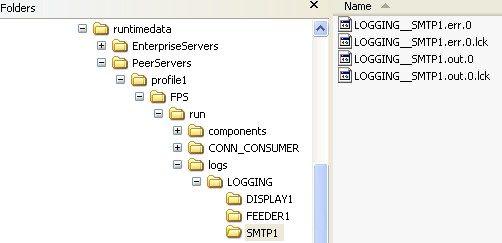
Figure 14: Log files
Console Handler: When the log handler is a Console Handler, the messages are logged on the console of the peer server on which the component is running. Figure 24 shows the logs on the peer console when the event process Logging is launched with the SMTP component configured with the log settings shown in Figure 25.

Figure 15: Log settings
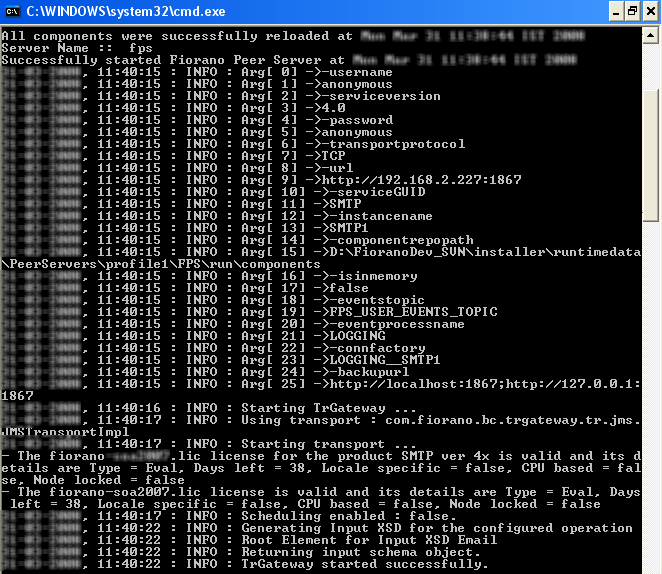
Figure 16: Logs on the peer server console
Custom Handler
In Fiorano 11, Service instances can be configured for custom handlers also. Custom Log handler allows to redirect the log messages to user defined location like file, console, JMS destination, and so on.
To add the handler for the service instances that should use the custom handler,
- In the properties pane, select Log Manager > Type as Custom Handler.
- Specify the class for Log Manager > Class Name property. This should be a fully qualified class name.
- Save the application.
Custom Handler implementation
The custom handler should be an instance of java.util.logging.Handler and should implement the abstract methods:
- public void publish(LogRecord record)
- public void flush()
- public void close()
This class should be made available to the peer server on which the component runs by adding appropriate classpath entry under <java.classpath> section of %FIORANO_HOME%\esb\fps\bin\fps.conf.